 My husband and I purchased this 1925 Craftsman home in the summer of 2018, before we realized I was pregnant with our second child. The plan was to do a 2-3 month renovation and not touch the kitchen (spoiler: We touched the kitchen). The entire renovation took my full nine-month pregnancy to complete and involved updating bathrooms, kitchen, and opening up walls. Once we finally moved all of our boxes in and spent the first night, I went into labor the next day. Before this home, we lived in a 1950s home that was mid-century in style. Since this home is from 25 years earlier, I think we’ve naturally adapted into a more classic version of what our style used to be. It was very important to us to renovate our home in a way that it looked fresh, yet age appropriate for 1925 and was still honoring the history of the home.
I’m an interior designer and truly have a love for all styles, so sometimes I struggle narrowing what I would say my personal style is other than eclectic. I like a little Scandinavian, a little vintage traditional, a little mid-century … you get the idea. I would say my style is finding a way to put together all the things I love that make our home feel welcoming, cozy and fun. Many items in our home have been collected through the years by thrifting, estate sales, picked up while traveling (remember traveling?!) or family pieces that have been passed down. I believe people can have more than one style preference and reserve the right to change their minds and evolve in style as they move through different life stages. (cough … kids … cough). One goal I have now that we have children is to create a space our kids (1 and 5) feel comfortable.
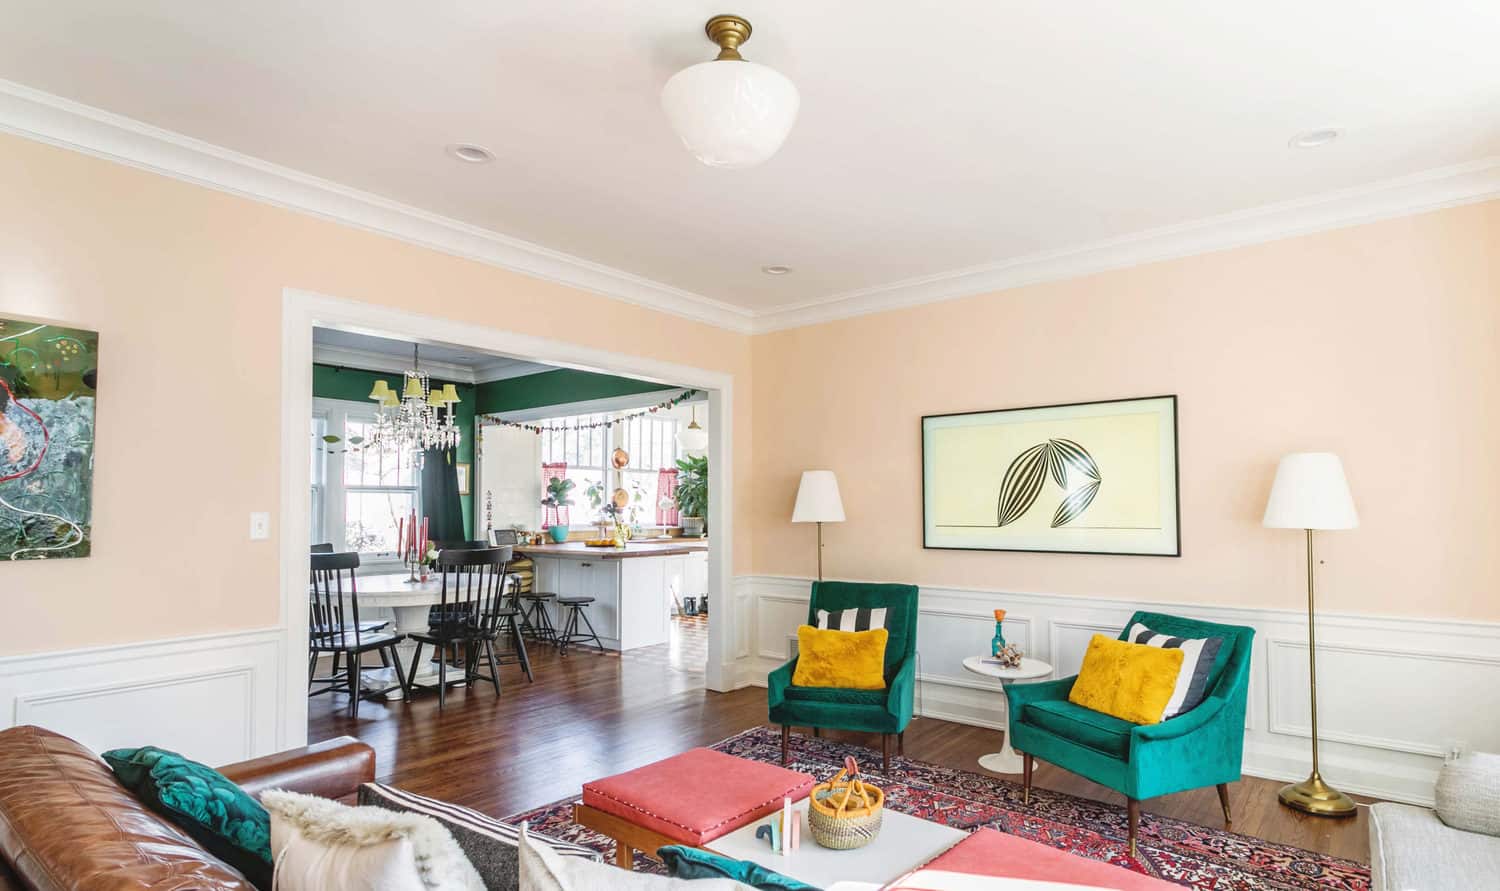
 Above shows the main family room space as it was when we moved in and how it looks currently. We widened the opening into the dining area, matching the original millwork around the wider opening to create an optional look. We also opened up the wall into the kitchen that you can see through the doorway, where the built in shelving is seen in the before shot.
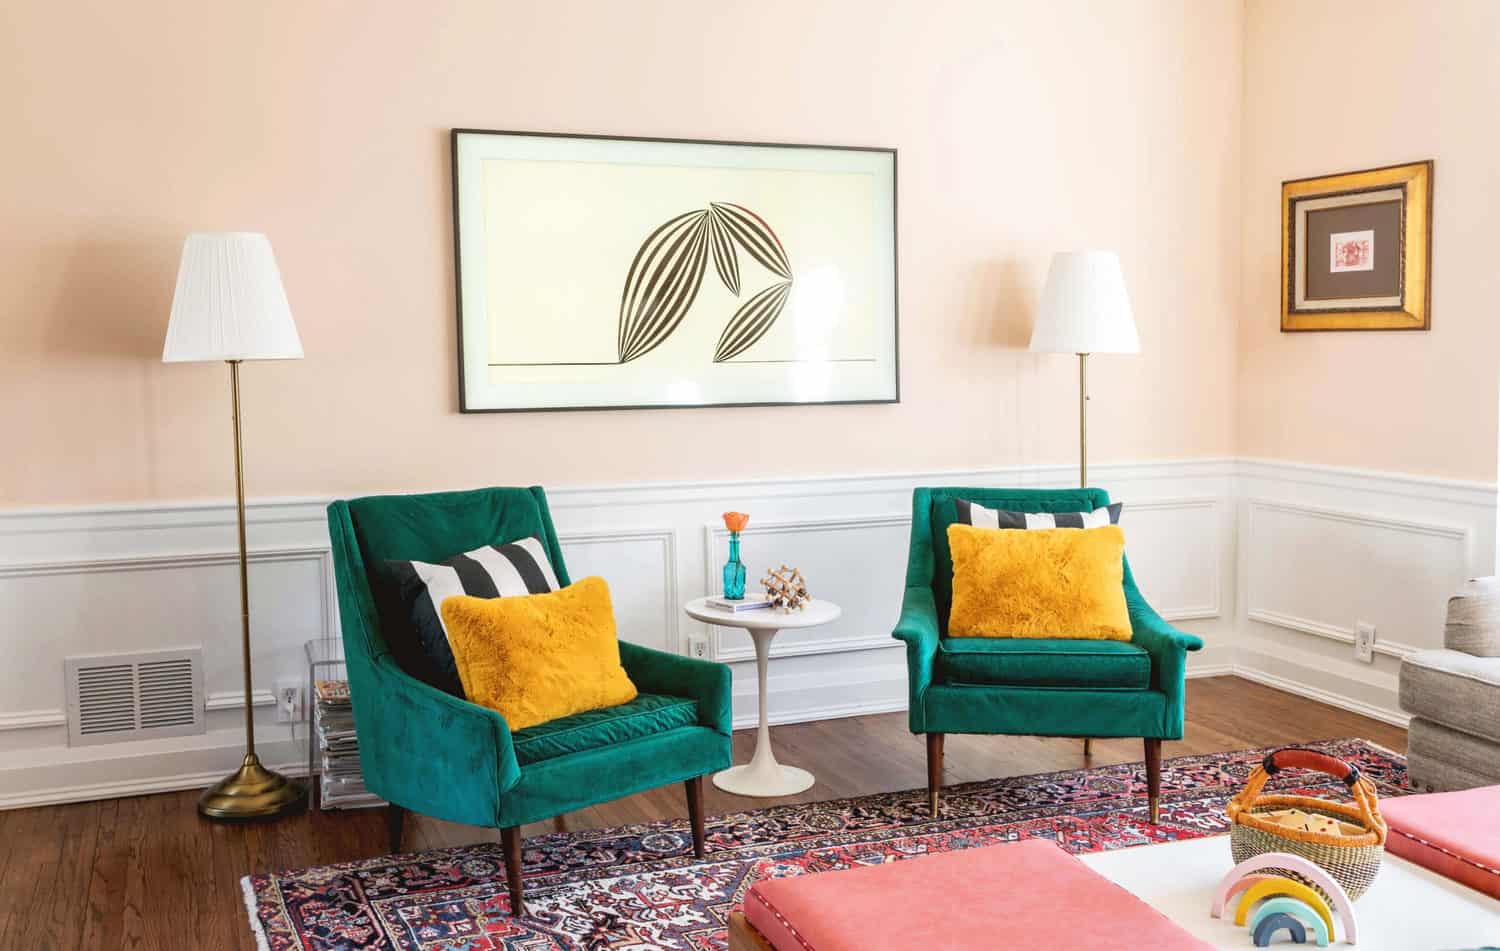
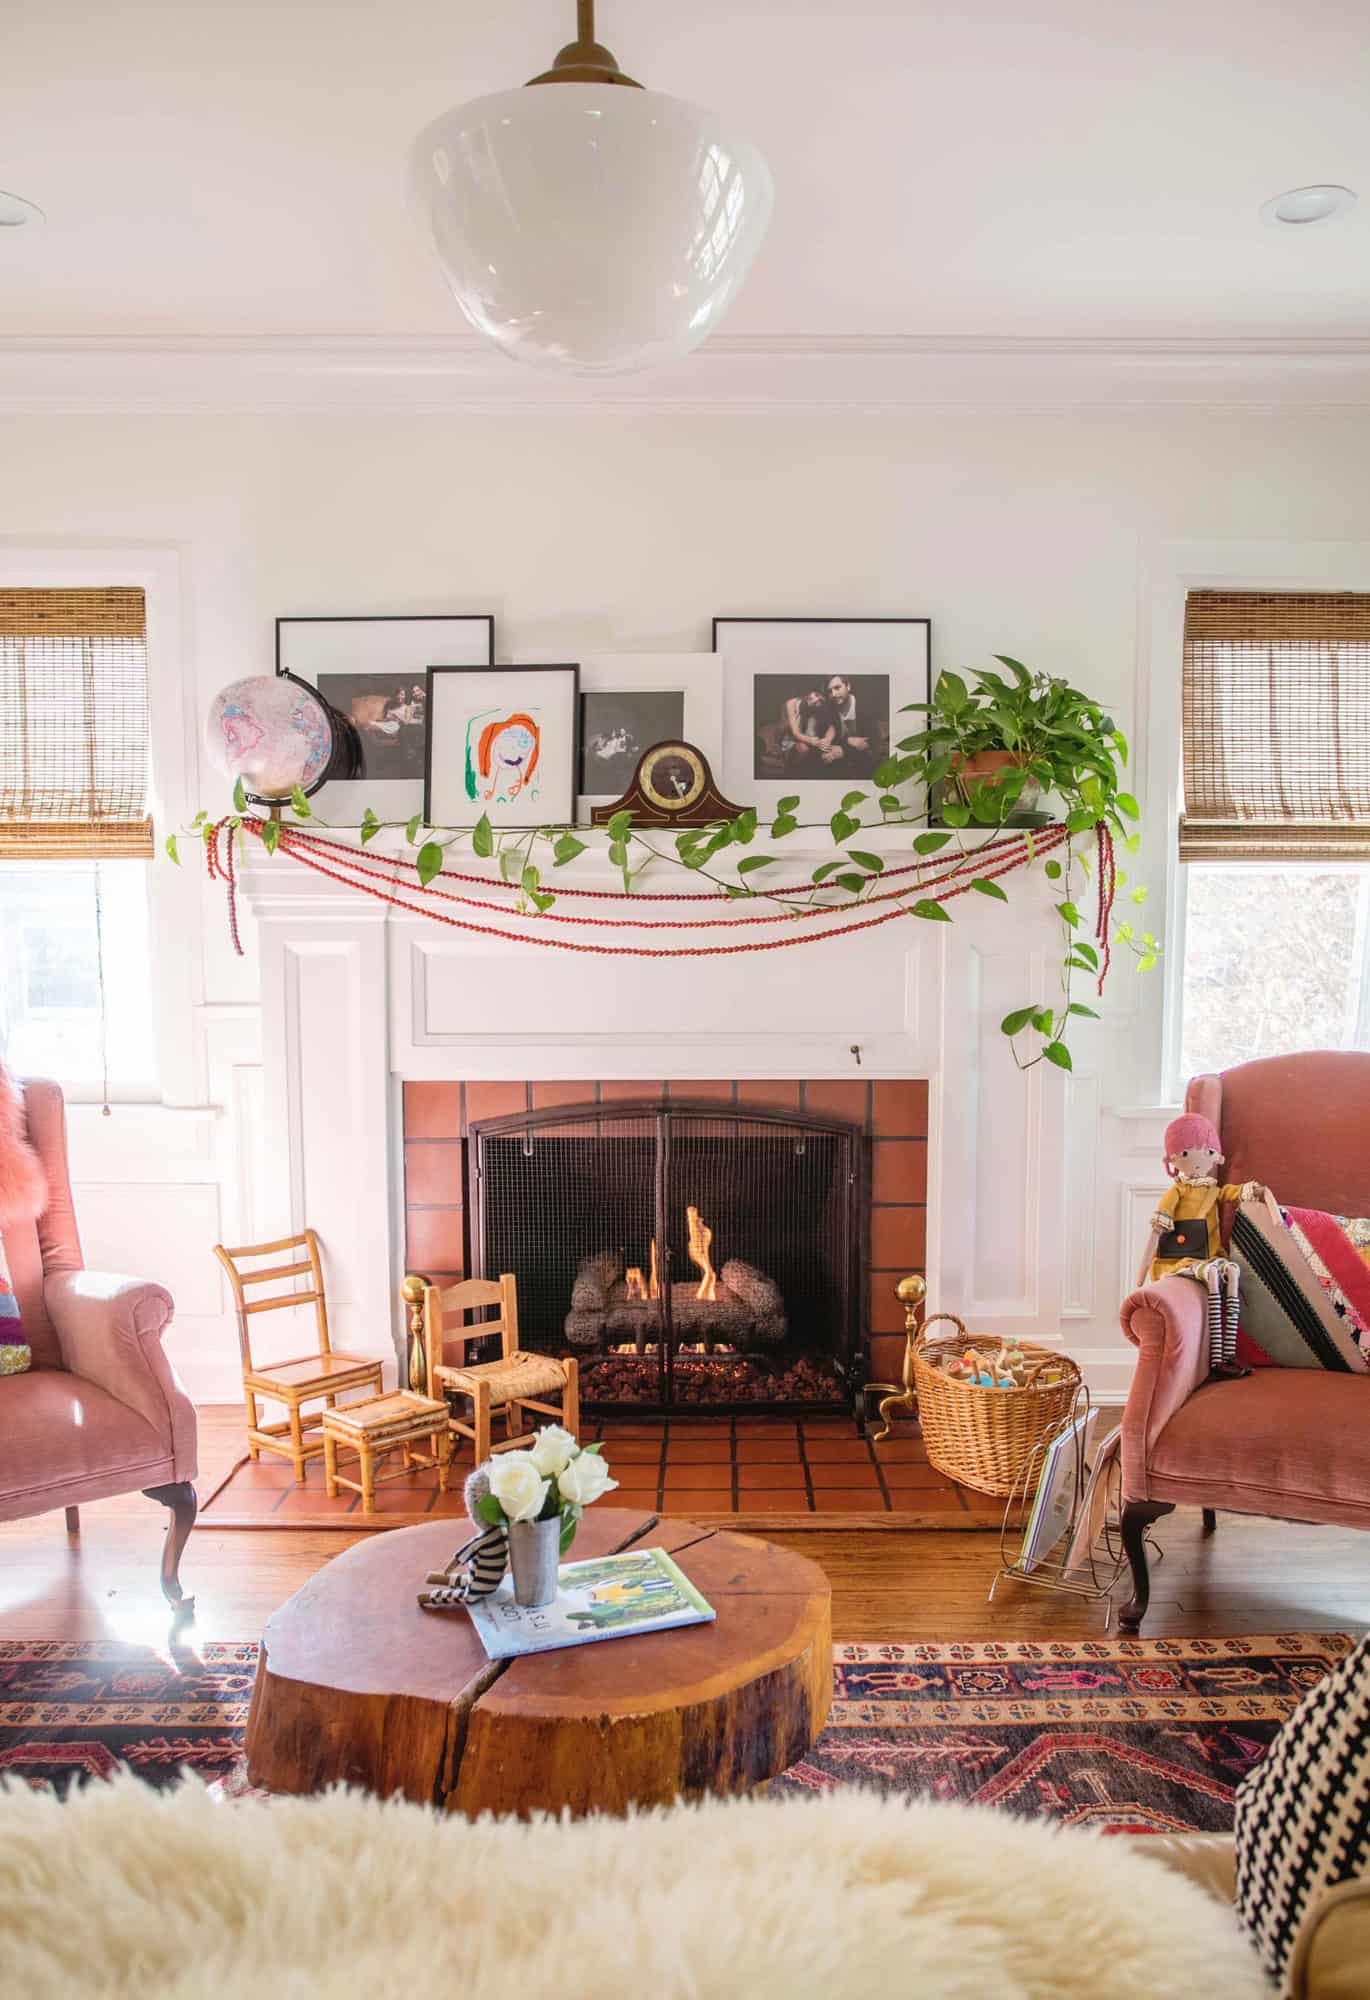
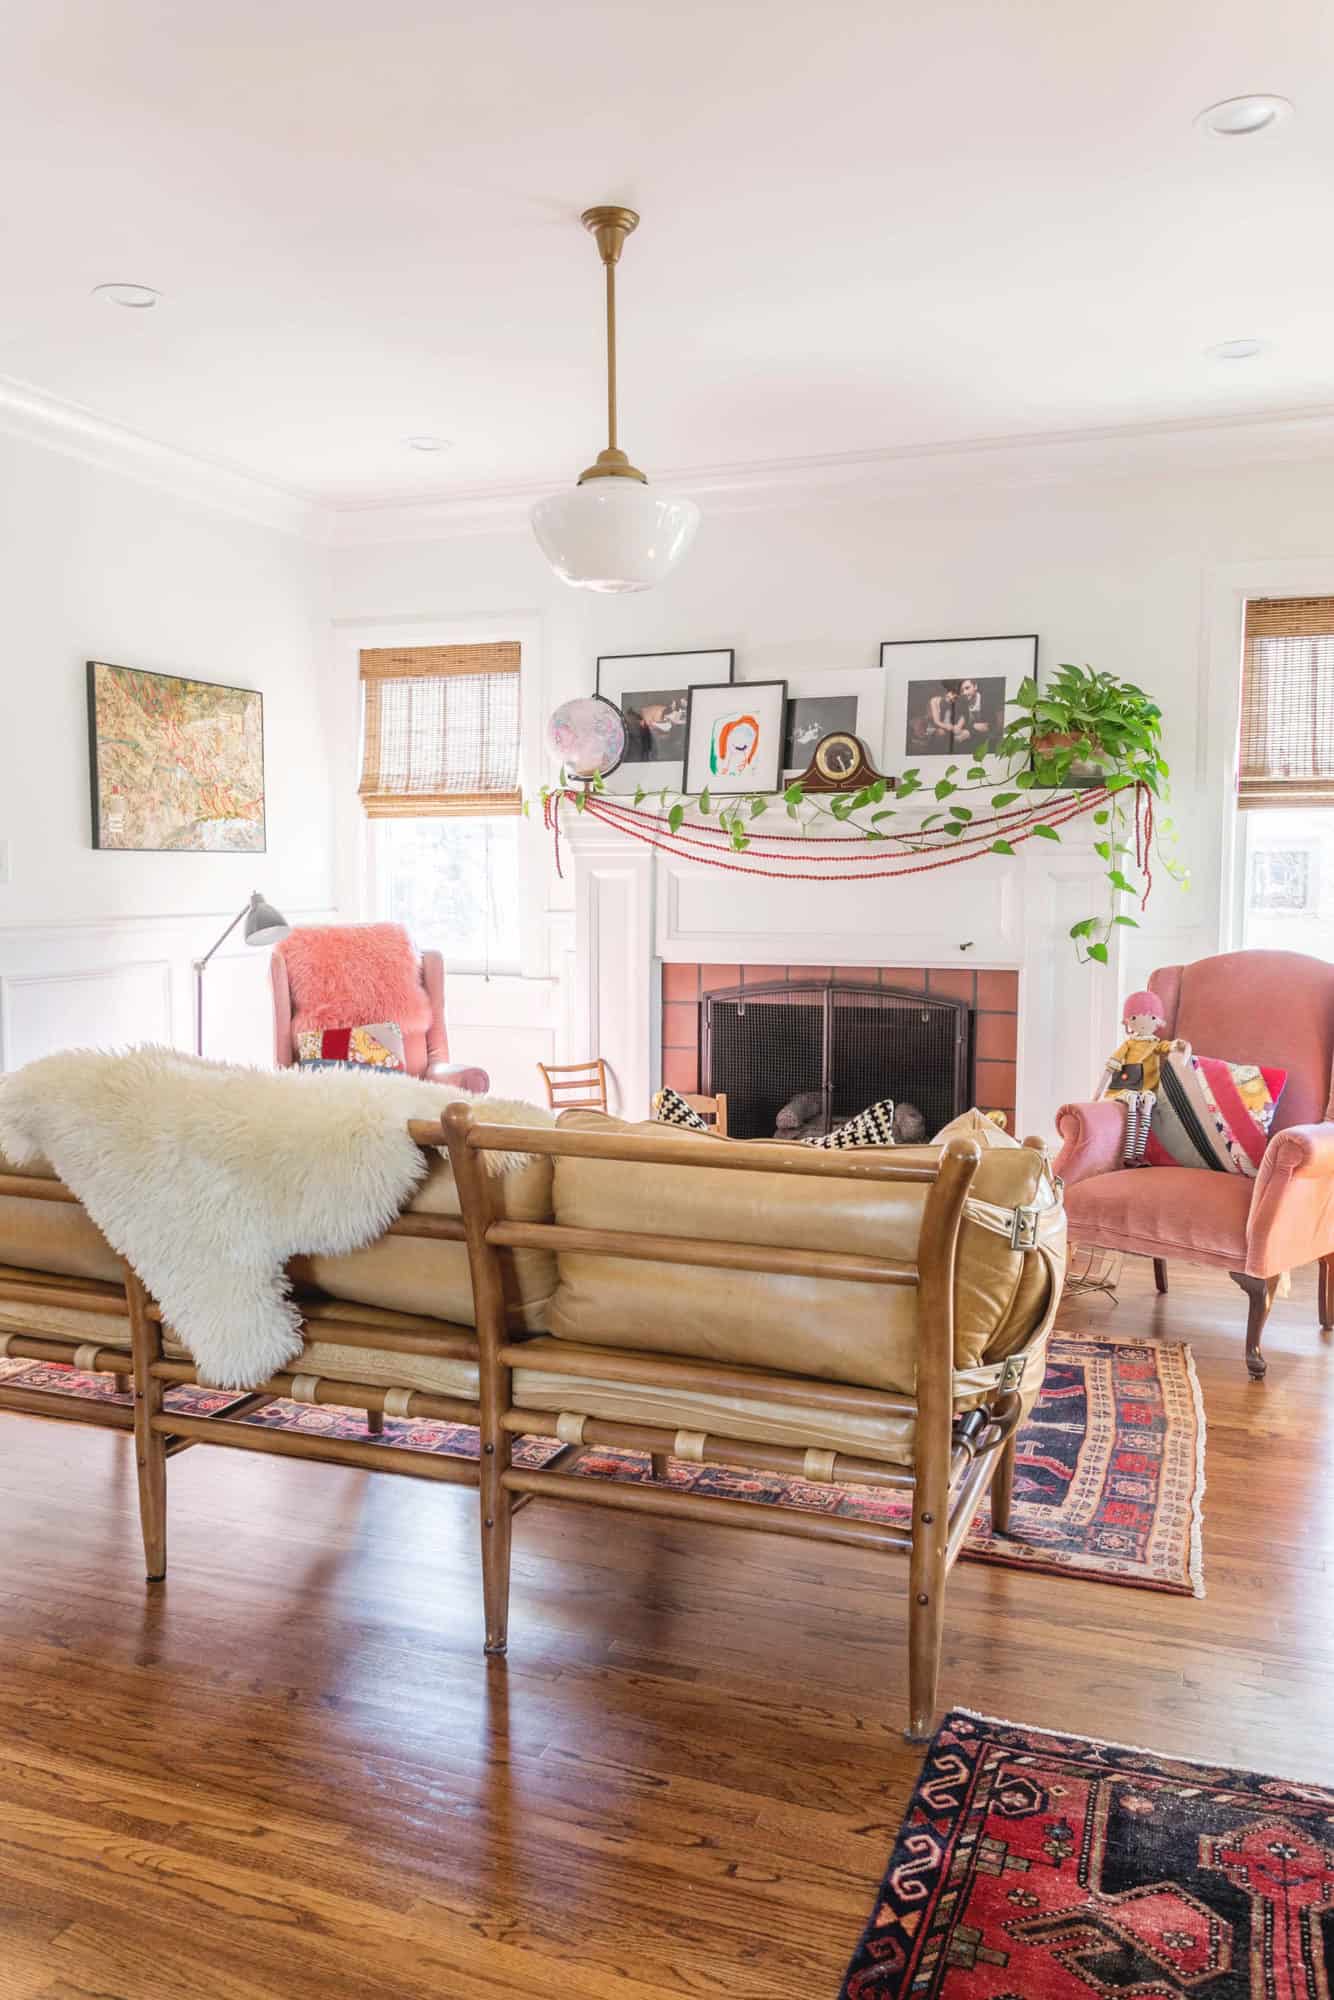
Our living room (below) has the main fireplace and is just off the main entryway. The previous homeowners used this area as a dining room since they had a larger family, but we love having both living areas on the main floor and utilizing the fireplace while hanging out.
When we first moved in we had everything painted white (if you’ve ever rounded the end of a nine-month renovation and pregnancy … you understand saying “… just paint it all white!”). We have since introduced a historical peach color into the family room and a dark green into the dining area, which really warms it up. I would love to add some wallpaper eventually, but my husband worked so hard making sure all of the walls were totally smooth, I don’t know if I can do that to him just yet. The green velvet chairs are actually from my grandmother’s home and are still the original upholstery, which is really special. The artwork and accessories are a mix of collected items from local artists, vintage pieces and a little IKEA sprinkled in here and there. Our schoolhouse light fixtures were located at an antiques store in a small town about 45 minutes away and we ordered the vintage down-rods online to fit them. I was unsure if they would even fit into the space well when I purchased them, but they were such a good deal I took the risk and they ended up being perfect! One tip I have is mixing expensive, one-of-a-kind items in with normal, inexpensive items. It really seems to make everything feel like it’s somehow more expensive.
All of the rugs on the main living floor of the home are vintage (mainly Turkish or Persian) rugs around 70-100 years old. They really make the home cozy and I don’t regret having them everywhere. Spending a little more on vintage rugs I will keep for the long haul has been my main splurge on furnishings for the space. Another rule I always try to stick to is filling my home with items I truly love that are interesting. I guess that’s why I like old stuff so much, it’s usually one of a kind and has a fun story to go along with it. Having a style that’s inviting and cozy is a big goal for me. I like the more “collected” look while my husband is more of a minimalist. I love that he has an opinion on the design of our home and we really work together to find a happy medium. He helps edit my crazy ideas and I make sure he doesn’t live in a white box. Win-win.
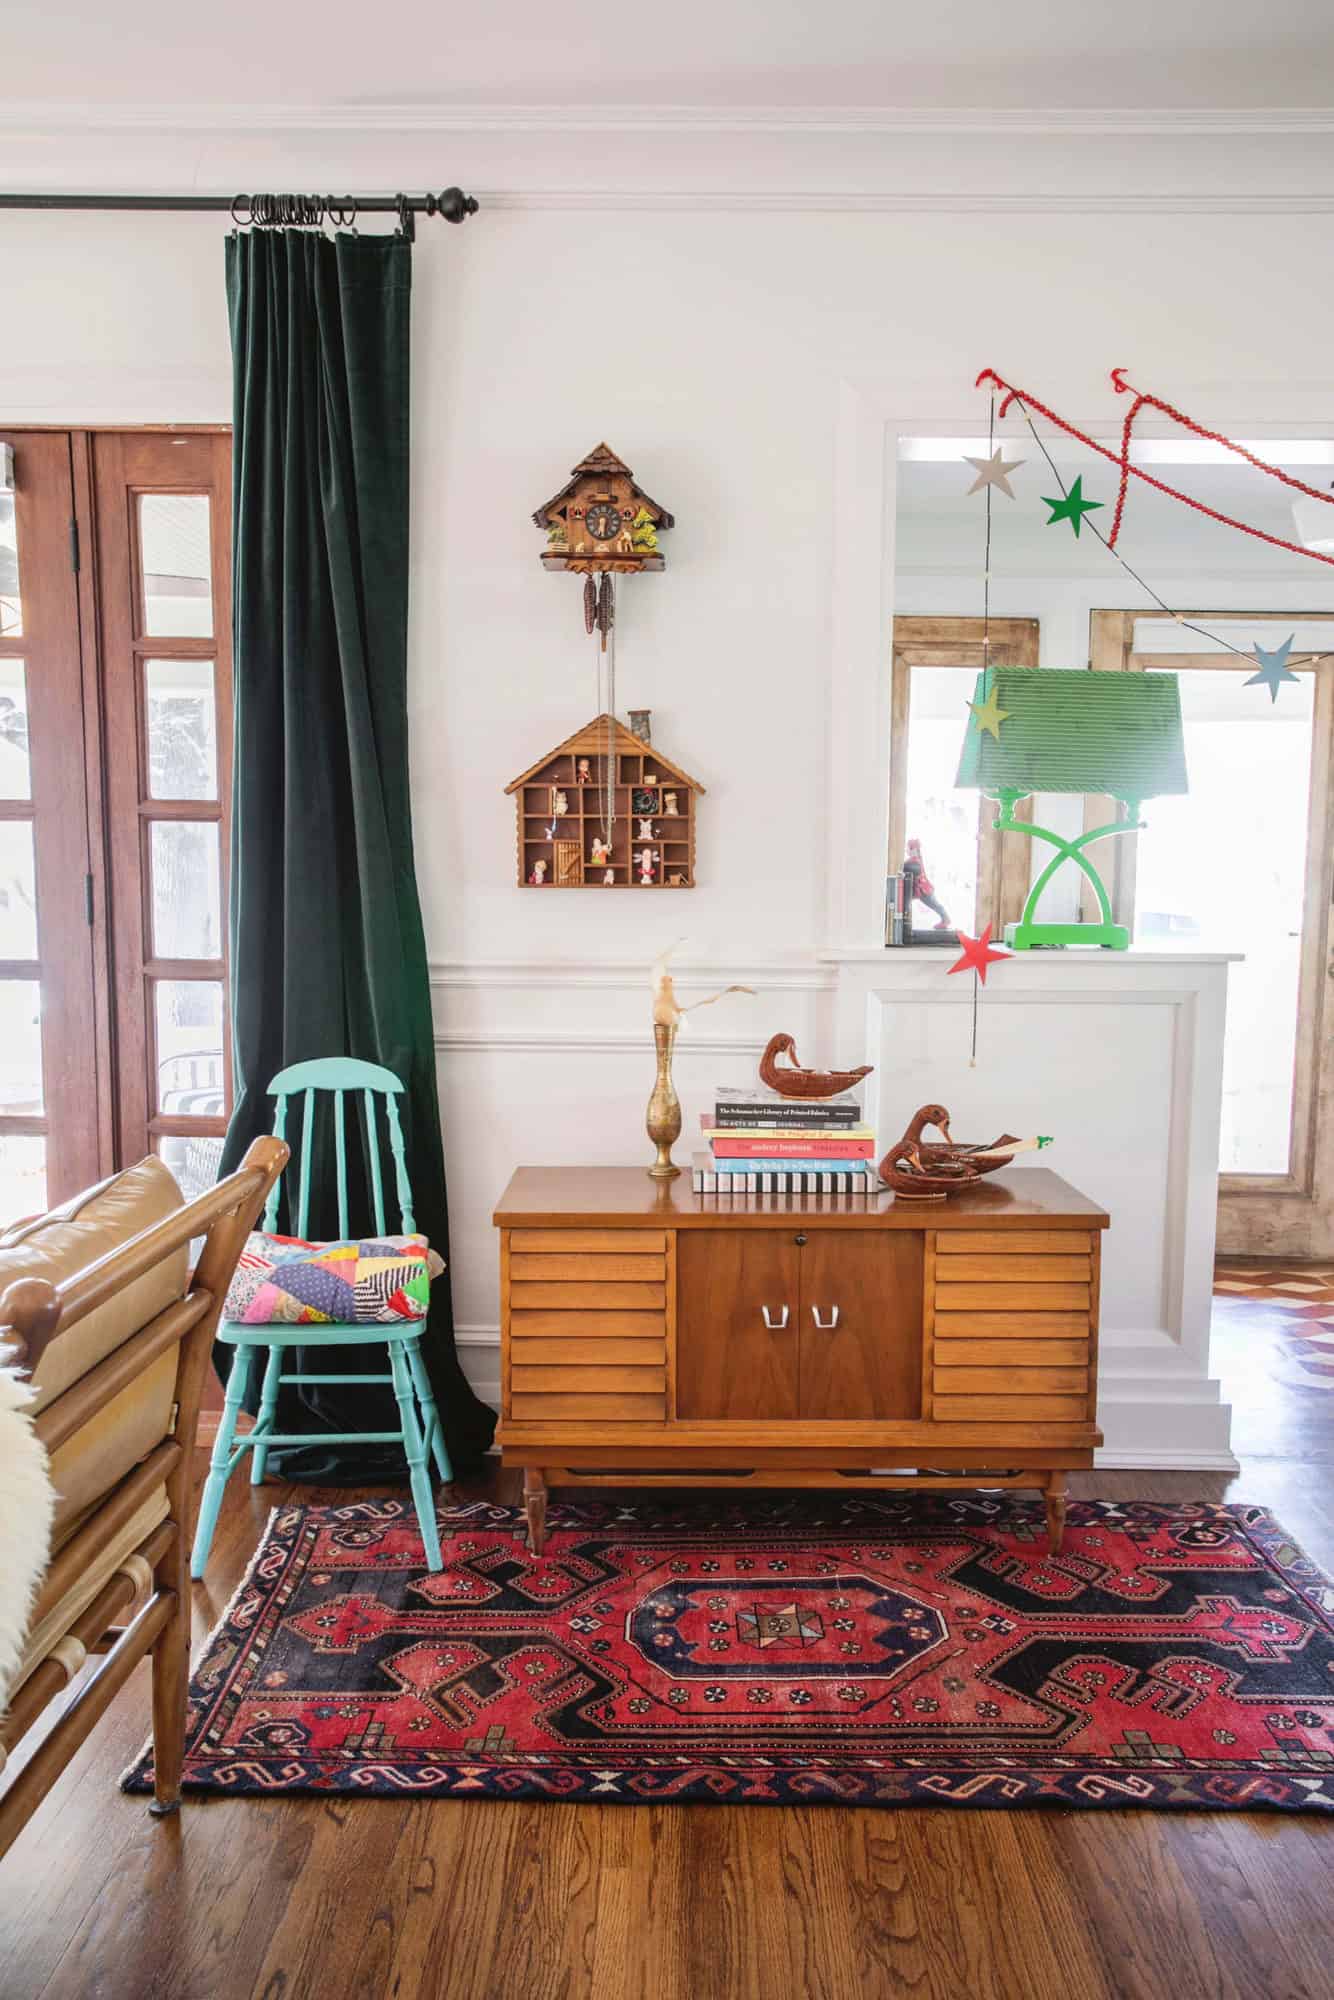 The entryway seen above is the main entrance into the home that opens up into a sitting area and the main staircase. This is where I have a workspace on the opposite wall than pictured. When I’m trying to create a unique space, locating one-of-a-kind items is really important. They are what give a space character and make it custom to each person. I love vintage shopping, stopping at estate sales and keeping items from grandparents that are meaningful. It’s more fun and creates a more unique space that doesn’t look like everyone else’s.
Just for fun, let’s break down where I got the items from the photo above: The green lamps (we have one on either side of the entry) were literally left on the side of the road in our neighborhood (already green and everything!). The cuckoo clock we purchased on a trip to Salzburg, Austria and the chest is a mid-century find and was purchased from IG stories, the teal chair and quilt are garage sale finds, rug is vintage, and bookend is from my grandmother. The gold vase is from a trip overseas, the wicker ducks are vintage, the shadowbox cabin is vintage and the garland was made and sold by a friend in my neighborhood. Curtains … IKEA! It definitely takes more time than running to one store and accessorizing everything on a single Saturday, but when you take your time, everything has a backstory behind it and just feels special.
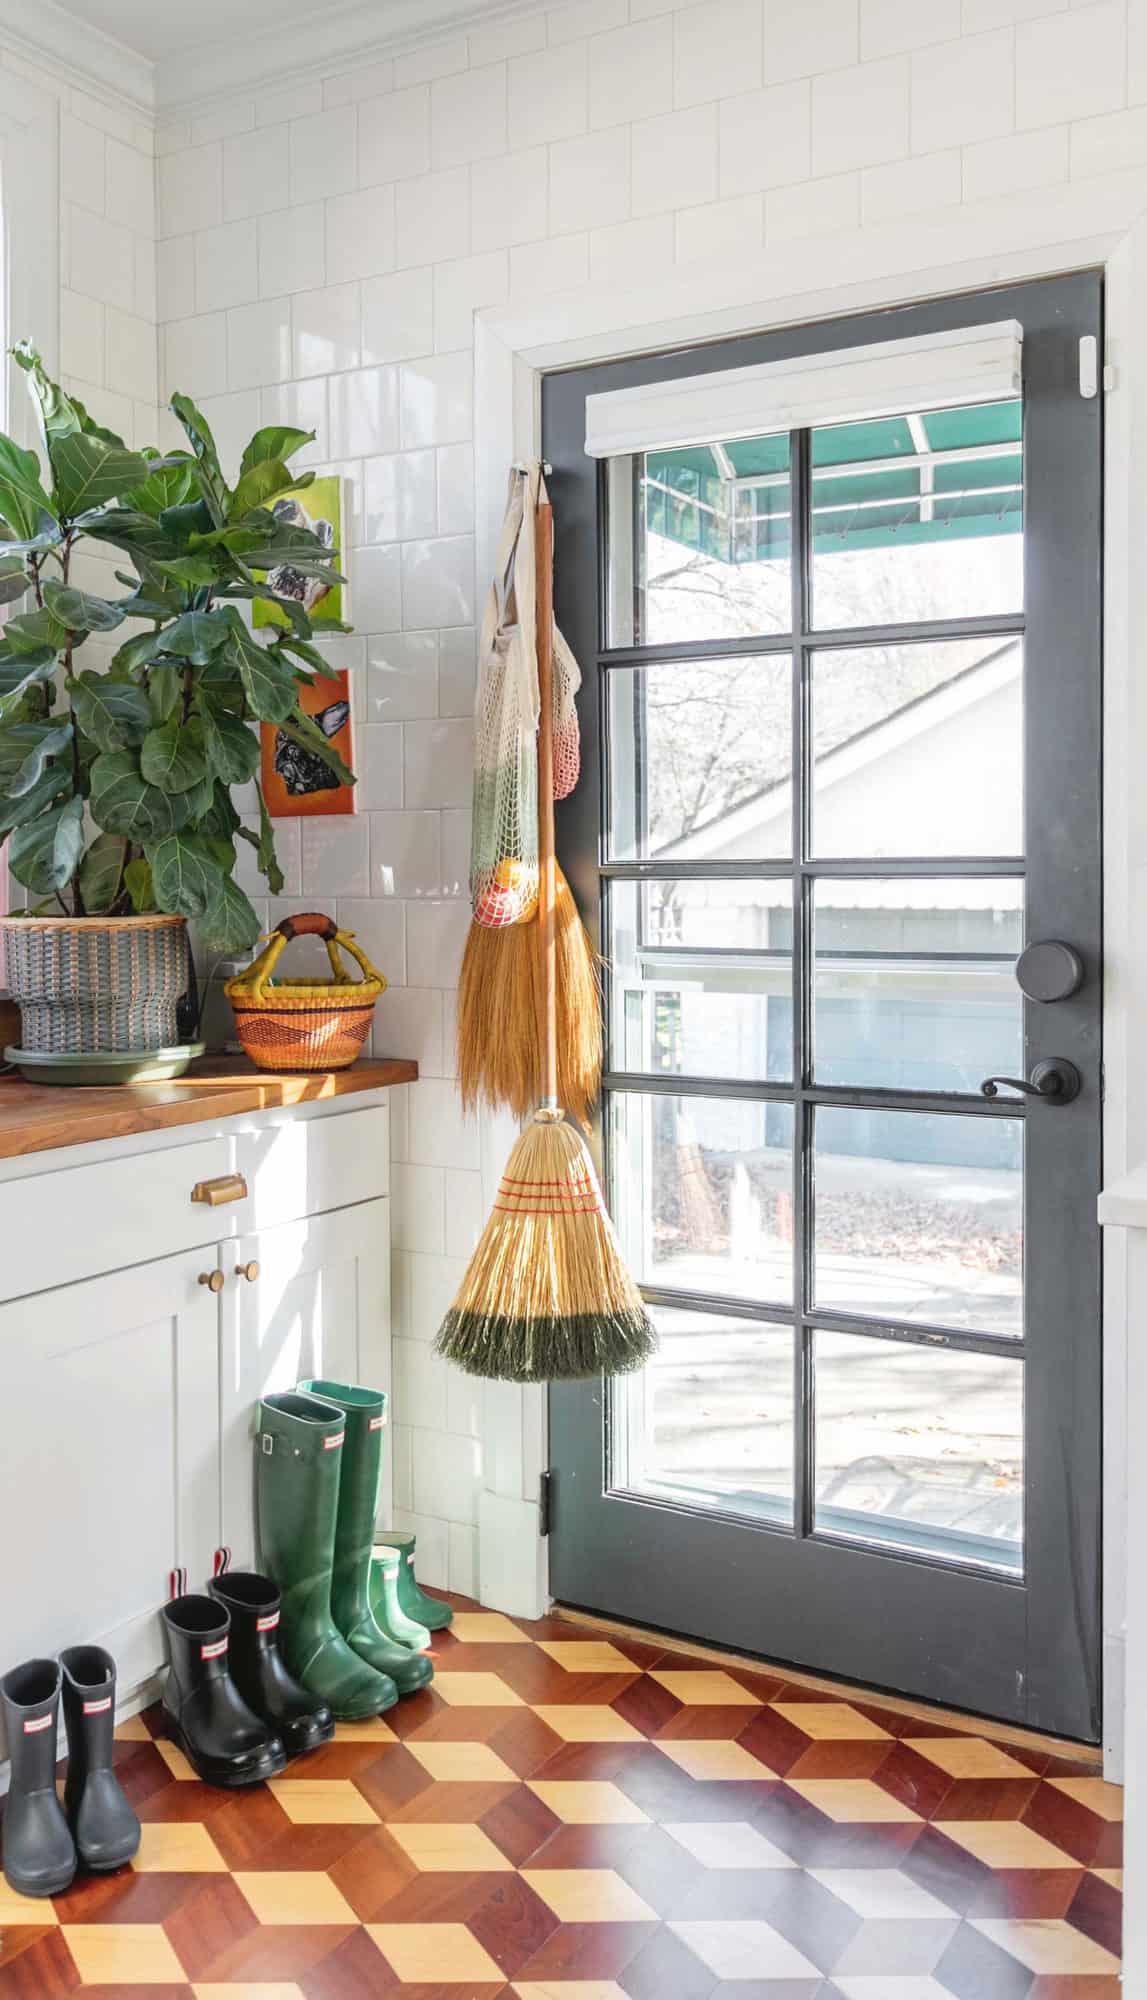
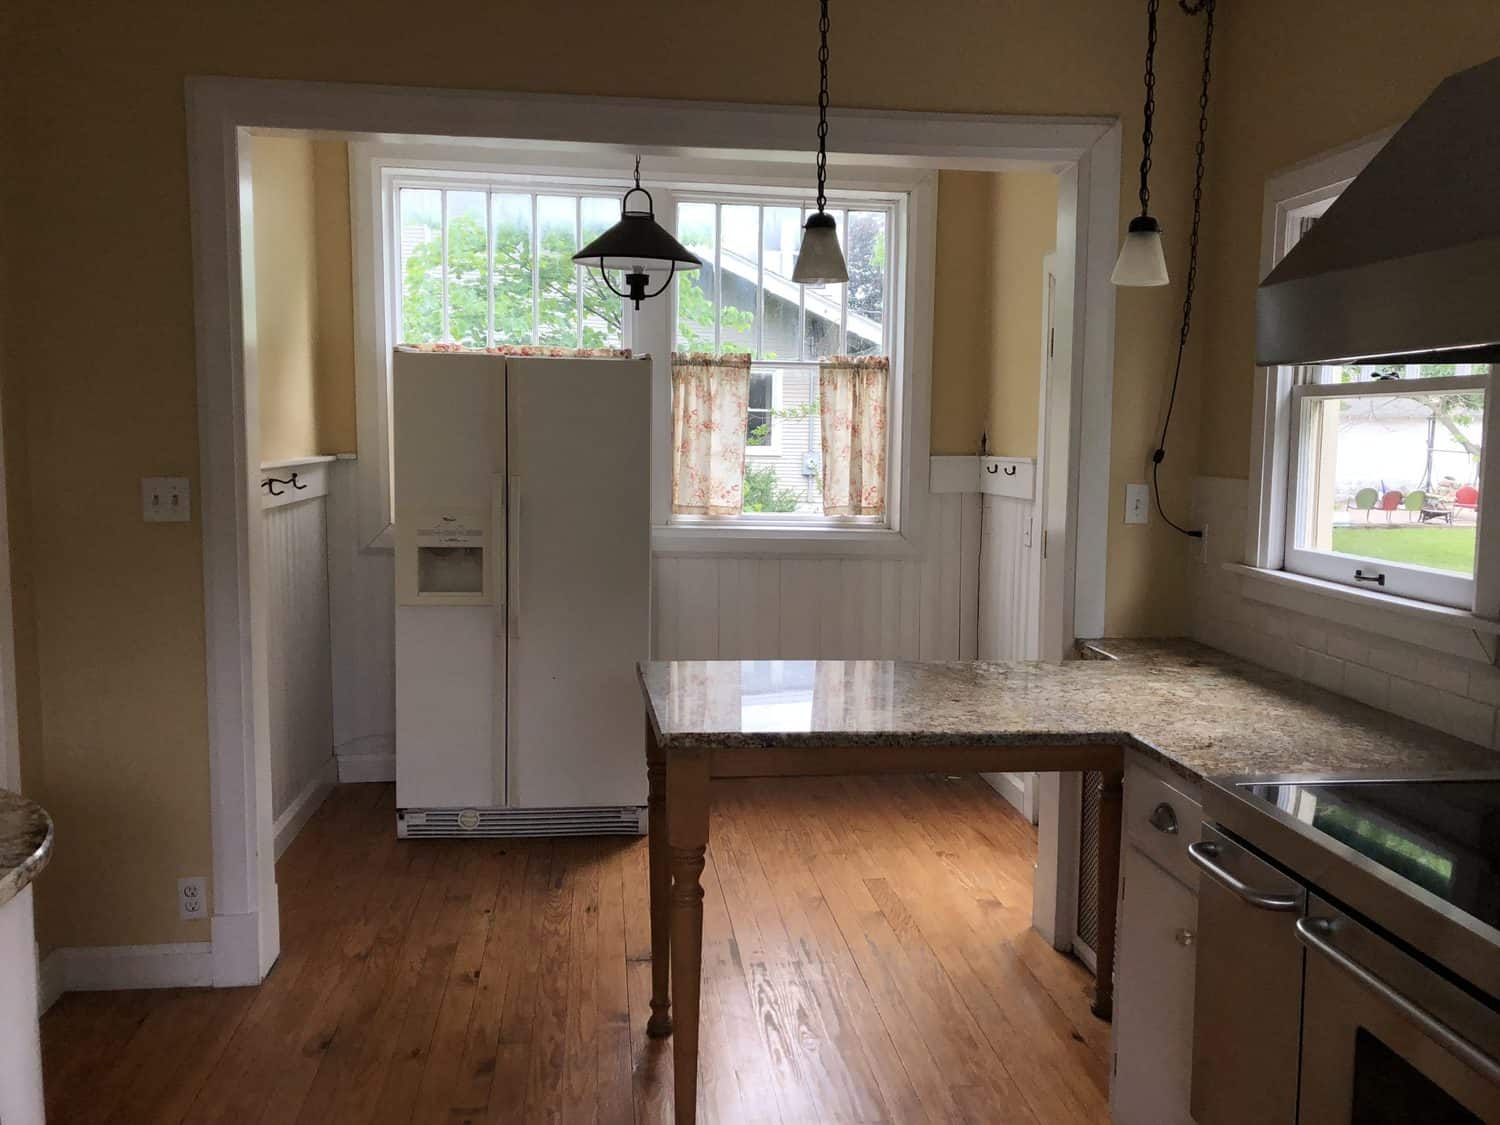 The before and after above is one of my favorites of the entire renovation! As you can see, the existing refrigerator was blocking one of the large windows in what was the mudroom area off the back door when we purchased the home. There was no place to put a refrigerator in the kitchen configuration, so it had been in this location through the past couple homeowners. We were just going to leave the kitchen like it was, but the flooring wasn’t original and couldn’t be sanded and finished again, so it had to be replaced. Then, we tried to come up with a way to sink the refrigerator into the wall to the left of it, cut a hole in the existing cabinets to put it, and so on. Every idea we came up with was OK, but not ideal. Each idea also involved cutting, patching, fixing, or moving everything around, so we finally just called it and decided to do a whole overhaul and took the kitchen down to studs. We actually listed the existing kitchen (countertops, sink, cabinets, dishwasher) on FB Marketplace and sold it for cash. The buyer even removed it and assumed the responsibility if he cracked the granite. It was great to start from a clean slate, repurpose the old kitchen so it didn’t end up in a dumpster, and also get a little cash to help with the new kitchen cost.
One thing that was a big deal was being able to completely remove the doorway and header into the mudroom and make the ceiling flush to connect into the full kitchen space. Since we were joining a kitchen area and a mudroom, having the ceiling flush and smooth really make the whole space feel like it was connected and not awkward. When we opened up the wall on the left where the walnut counter is, we kept the header and had a structural engineer take a look and get us some drawings since it was load bearing.
We debated whether we should put counters under the large window or should make it a window bench, but I’m so happy we settled with additional cabinet storage. I remember thinking we would never fill all the cabinets … but one instant pot and air fryer later, they’re full. I always vote for more storage when you can add it. (I also keep all of the kids art and craft supplies under that window). I don’t know what I’d do without the extra space now!
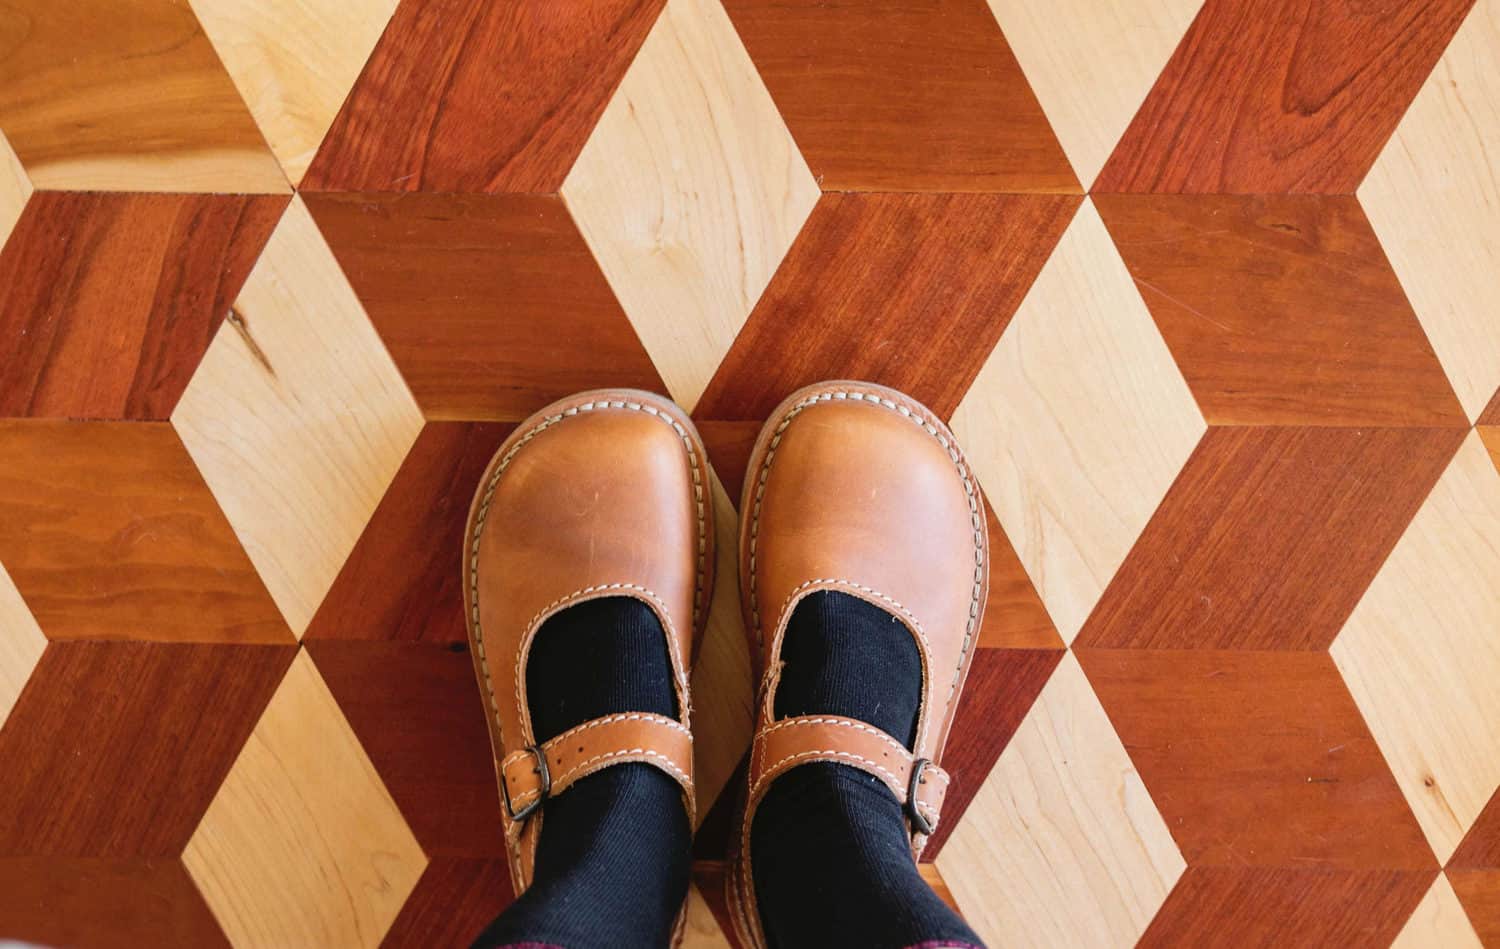

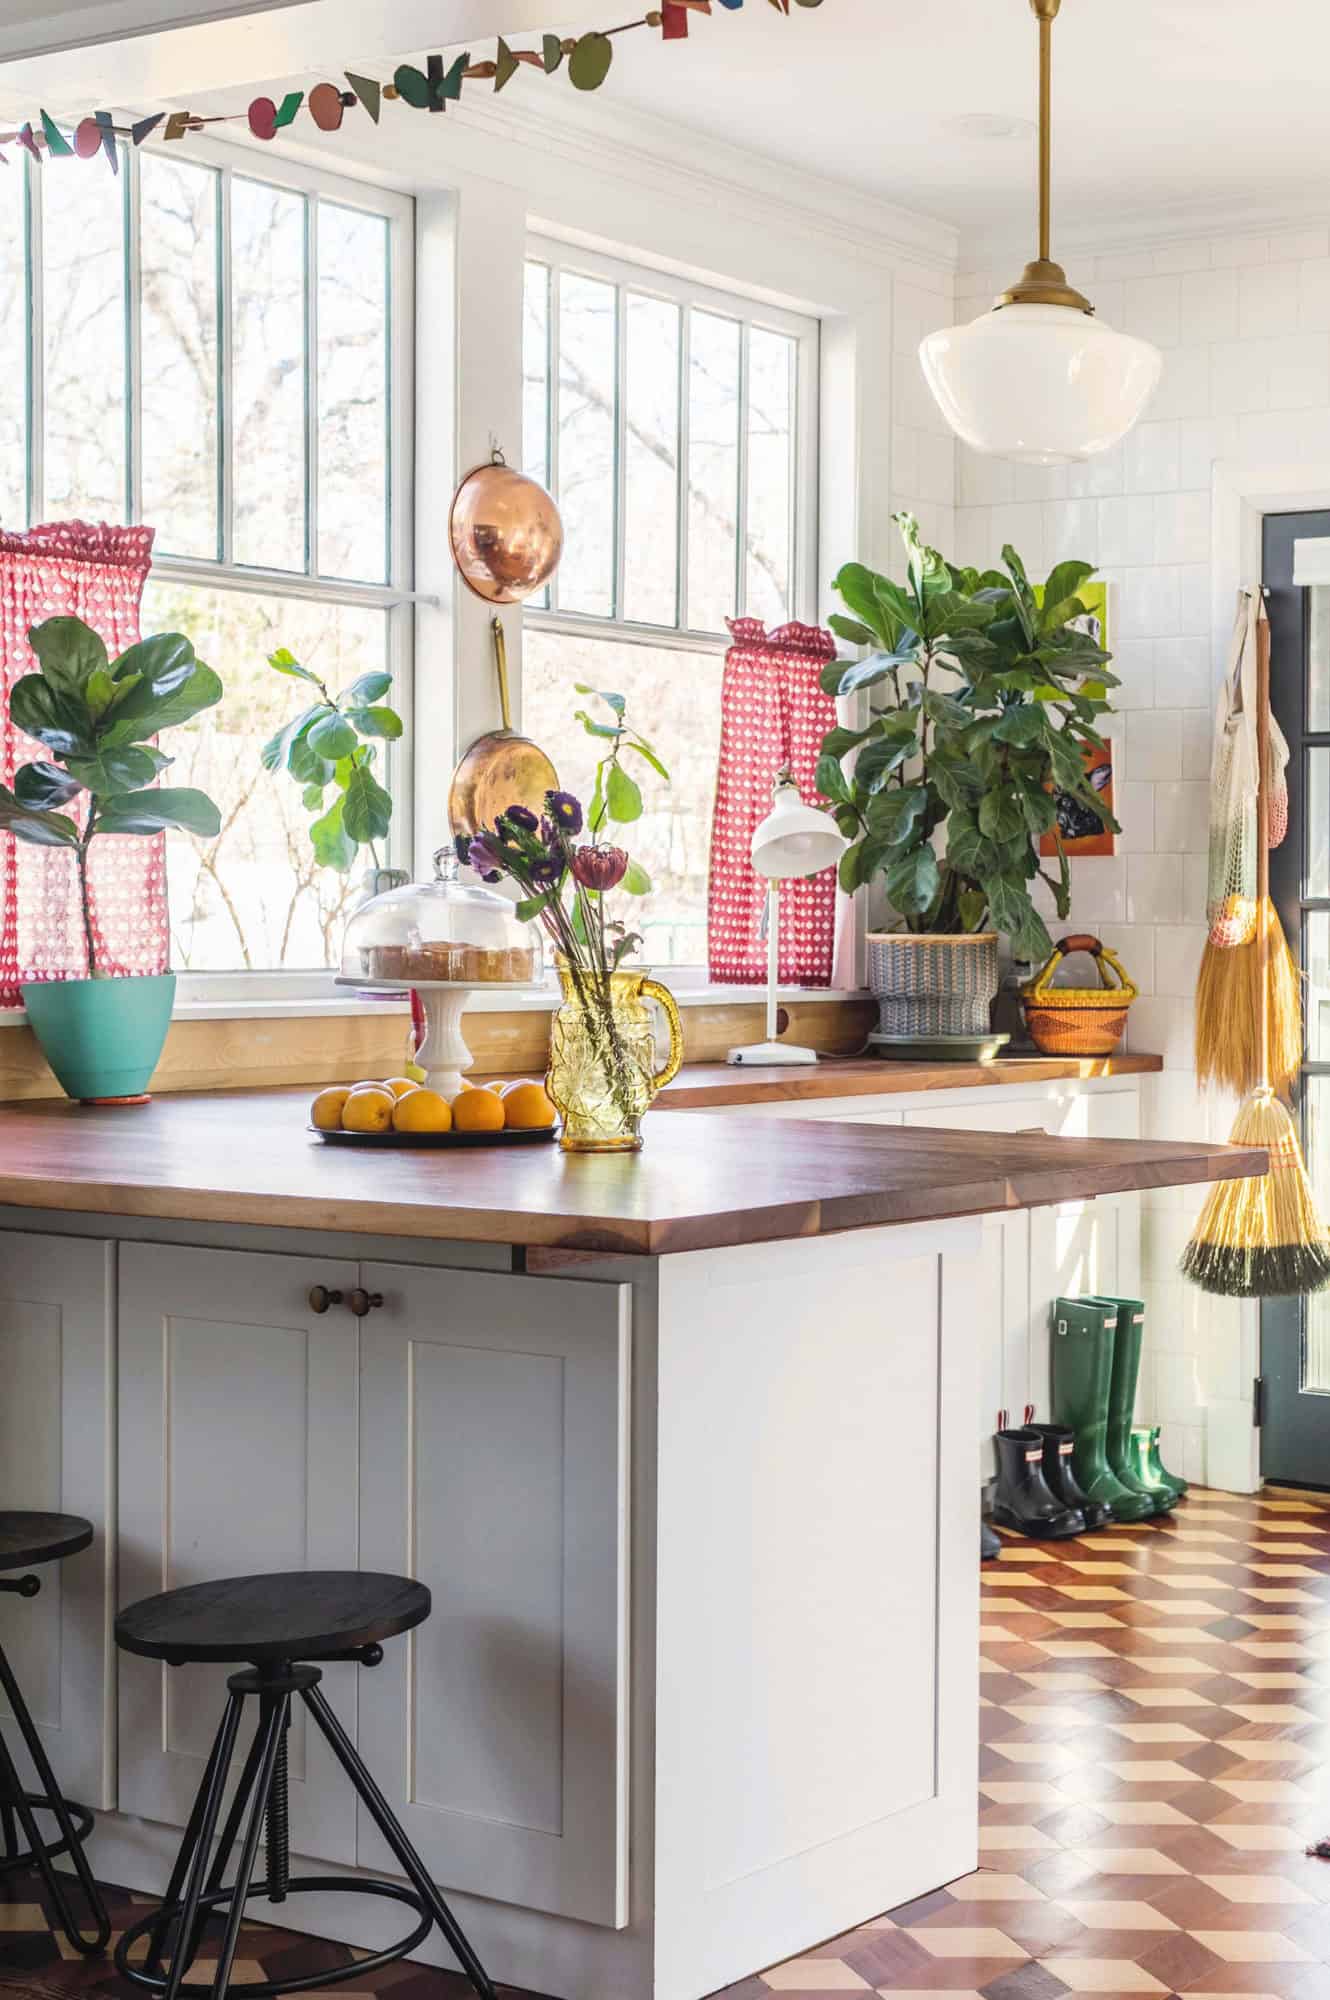
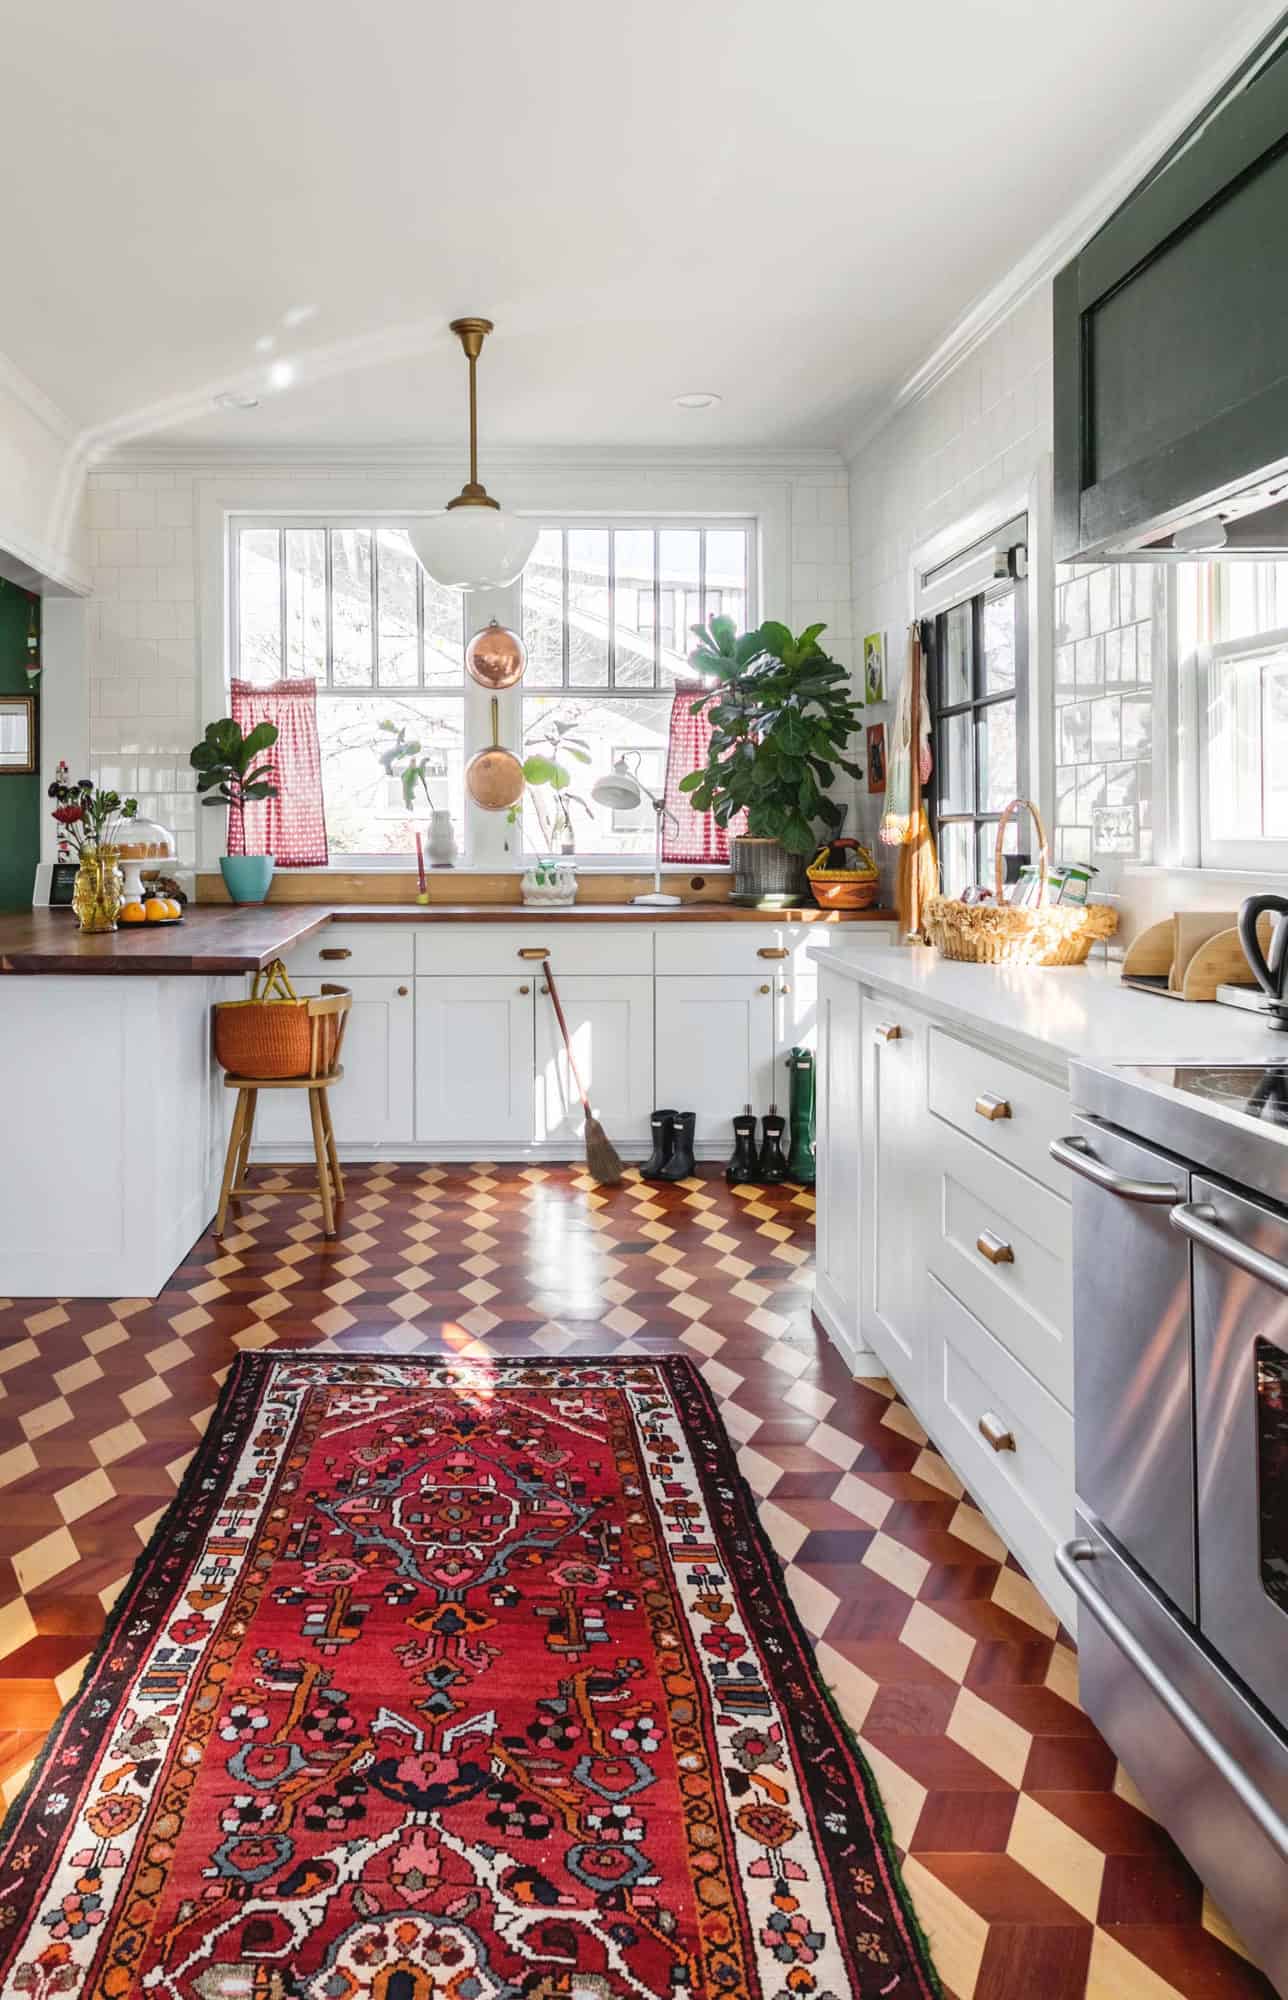
 I can’t continue the home tour and not address the story of our kitchen floors. We really took a risk with those bad boys and are so happy we did! I said earlier that the kitchen floors weren’t original (added in the ’50s with an addition to the home) and they couldn’t be refinished. We were going to just match the original thin 100-year-old wood like the rest of the home had. Jerry was our sweet late ’70s woodworker and did all of our floor refinishing and some other millwork in the home. He and my husband, Jonathan, actually came up with this idea and texted it to me late at night and said, “What about something like this?” Jerry for the WIN. It’s actually a historical parquet style that just happens to be popular in black and gray tile right now. We felt like we were going with so much white in the kitchen we could really “go for it” with the floor.
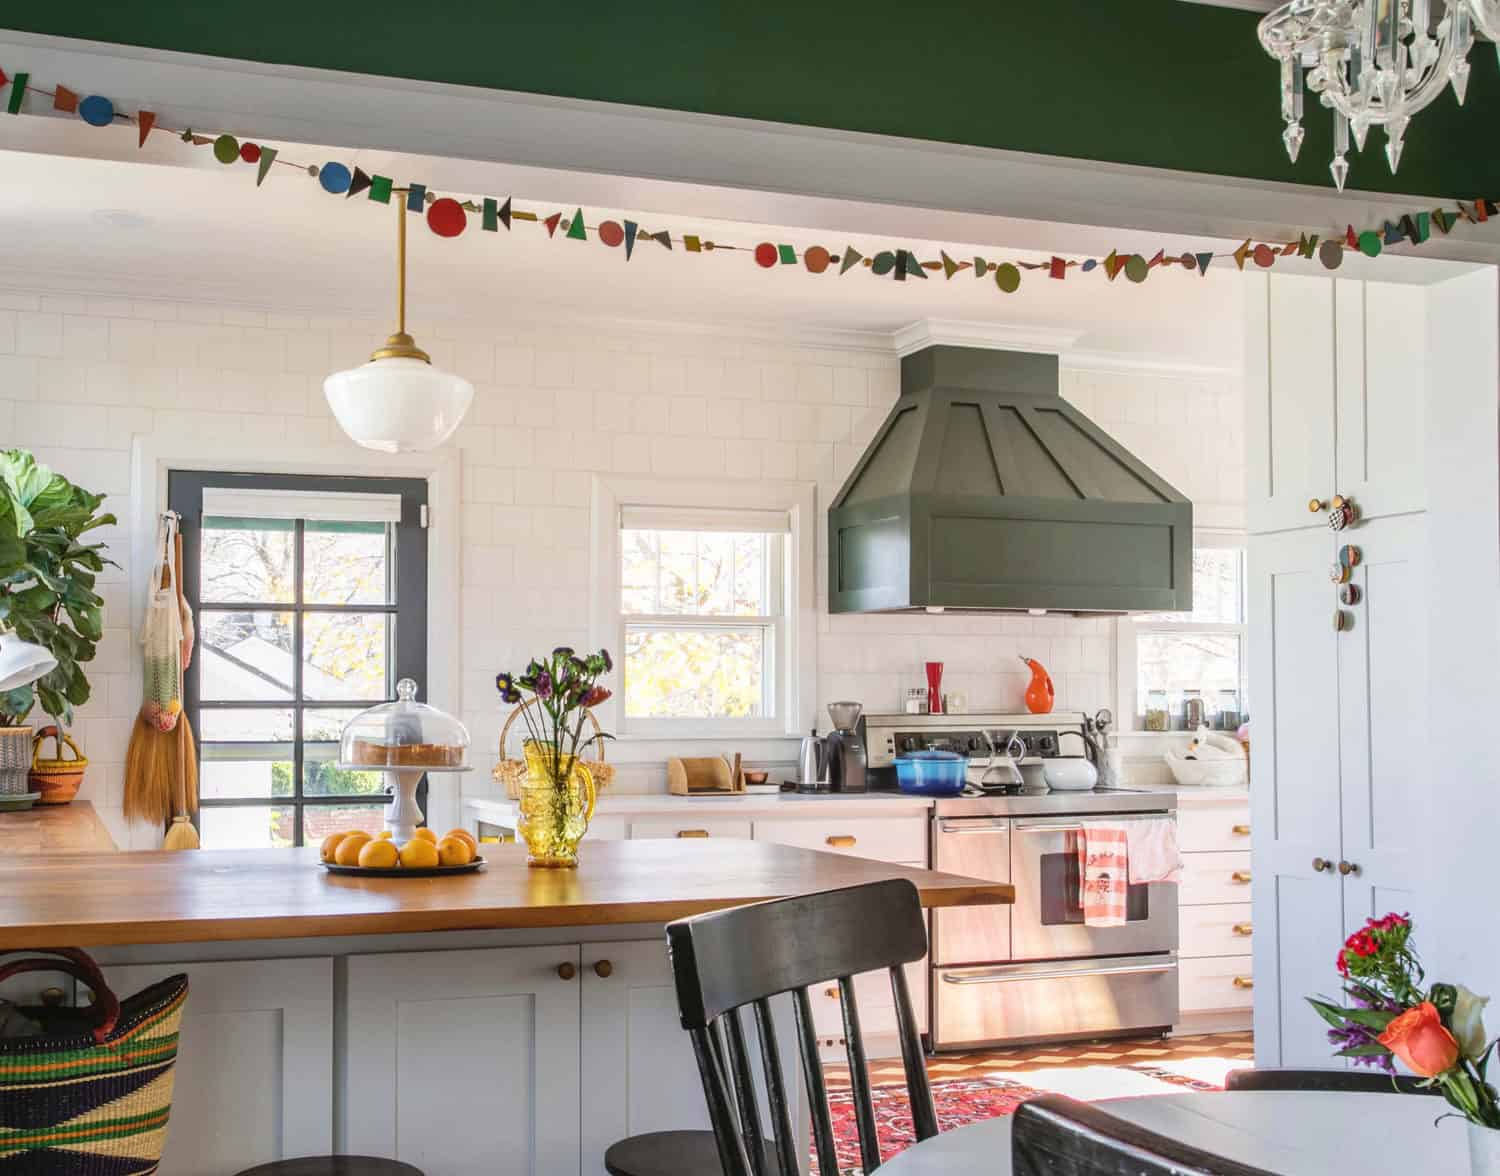
The floor is a mix of three types of wood with no stain, just a natural finish. Jerry actually hand cut each piece out of normal wood and assembled it by hand (bless him). We had some left over so we actually used it in the floor of our main floor half-bath as well as our entryway. Sometimes in a renovation you want to appeal to the masses for resale, and sometimes you say, “We may die here and we like this cubic geometric parquet floor.” Jerry also built our dark green, wooden range hood around the existing hood. He built it in a way that it could be replaced if it ever quit working and covering up the normal stainless hood really gave it a custom look.
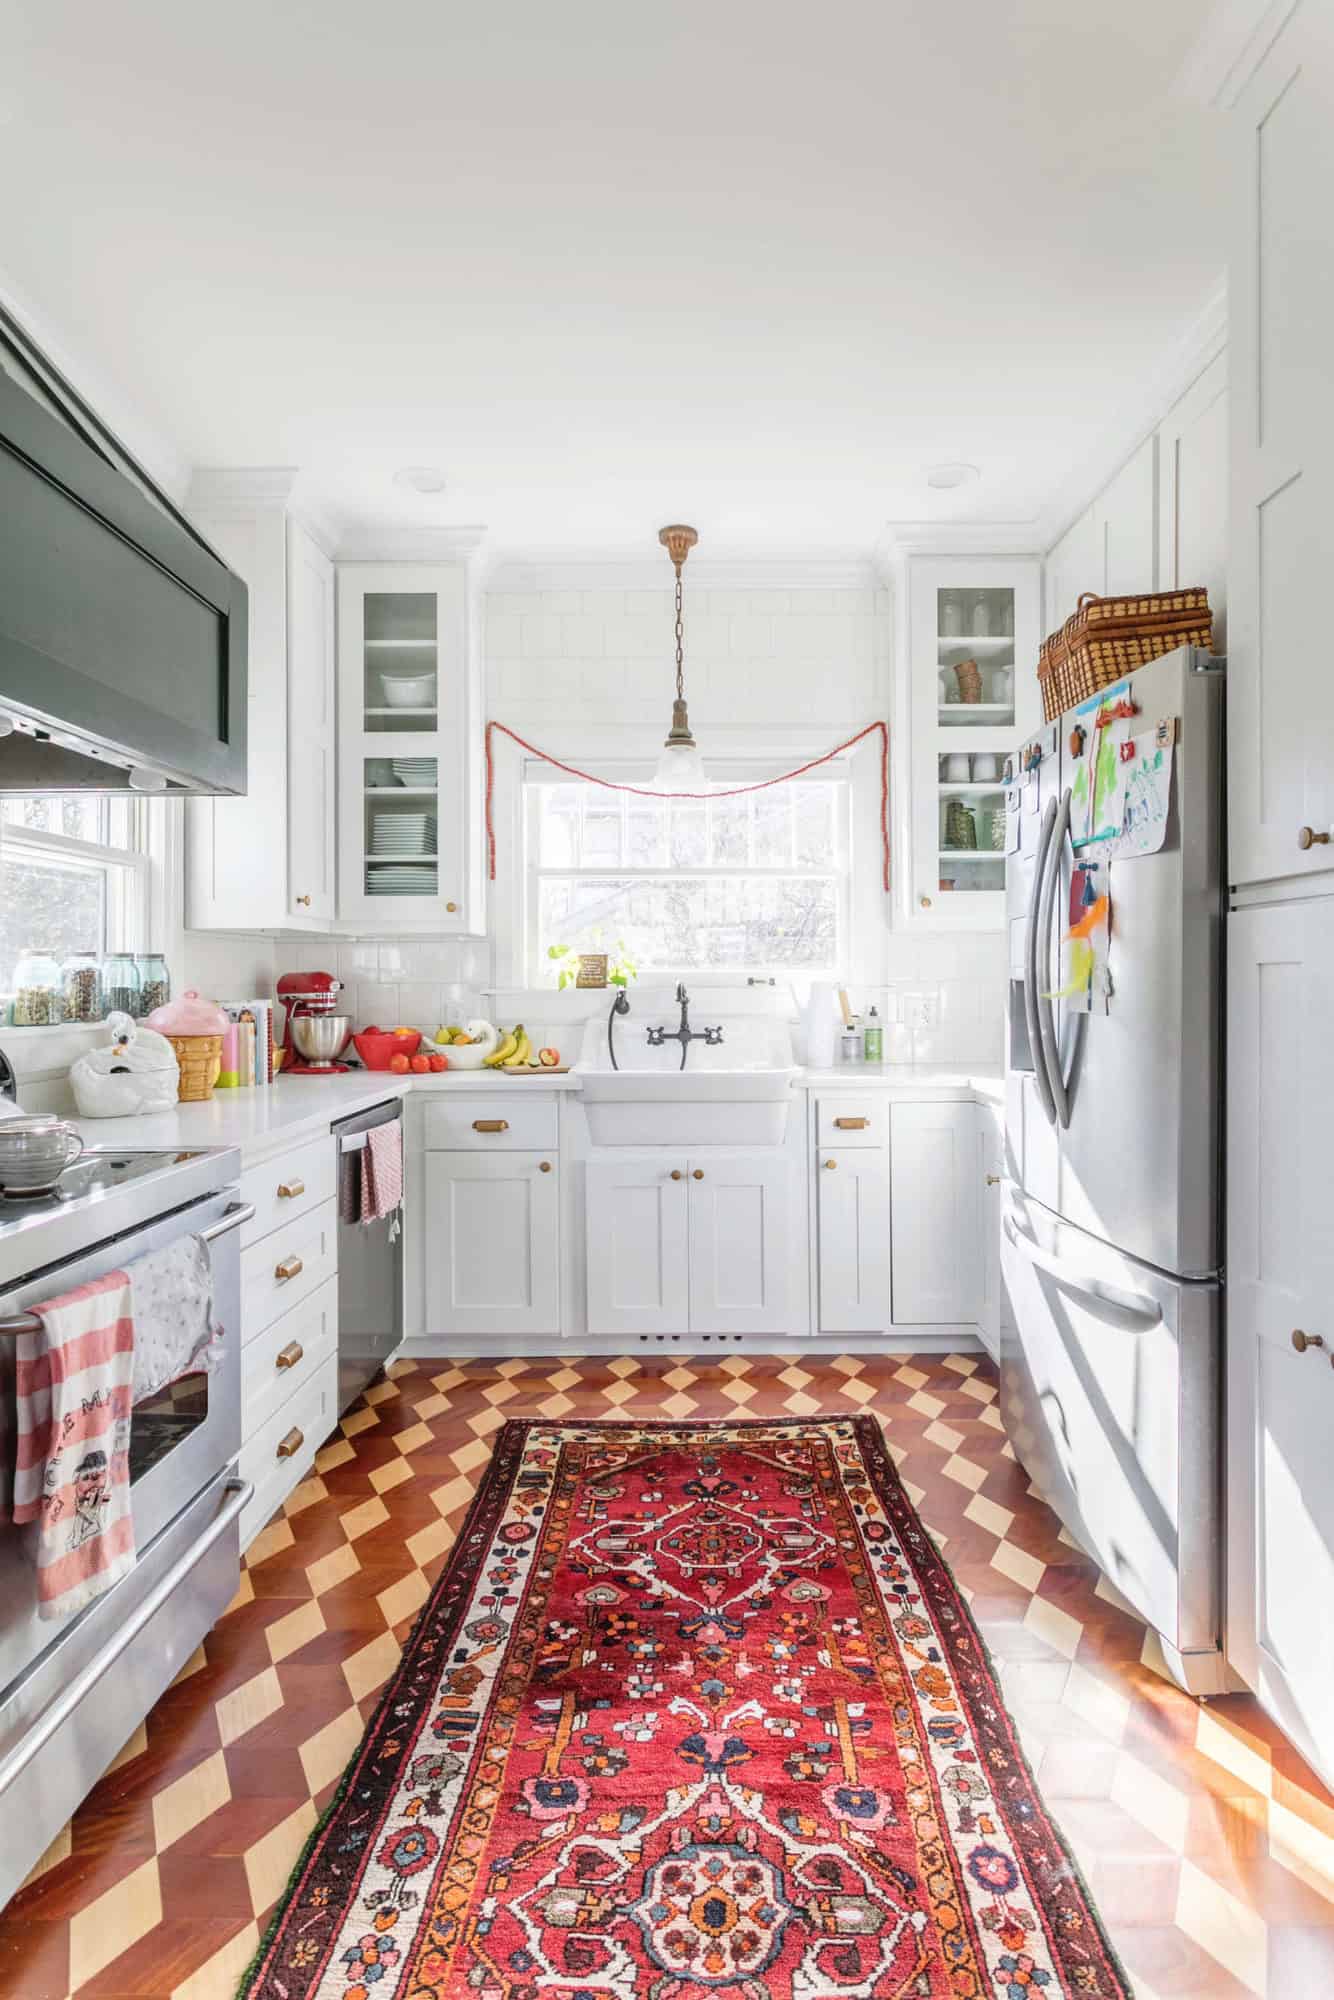
Another thing I love about the kitchen was the decision to take the tile and cabinets all the way to the ceiling. The cabinet maker and tile guy both weren’t sure about that idea since the ceilings are 9′ tall, but I’m very thankful I stuck to my gut after being asked “Are you sure?” a couple times. I have a little step ladder I just slide over if I need to get to a tall shelf and it doubles as a kid stool to help with cooking. I love the additional storage space and have all my seasonal and party plates up there. Having 6×6 tile all the way up to the ceiling for the entire space actually didn’t cost much more than tiling one of our bathrooms and really gives the kitchen space a cohesive look, especially since we were joining two areas into one. I have already splashed spaghetti sauce above the window over the sink one time already … so see? It’s very practical.
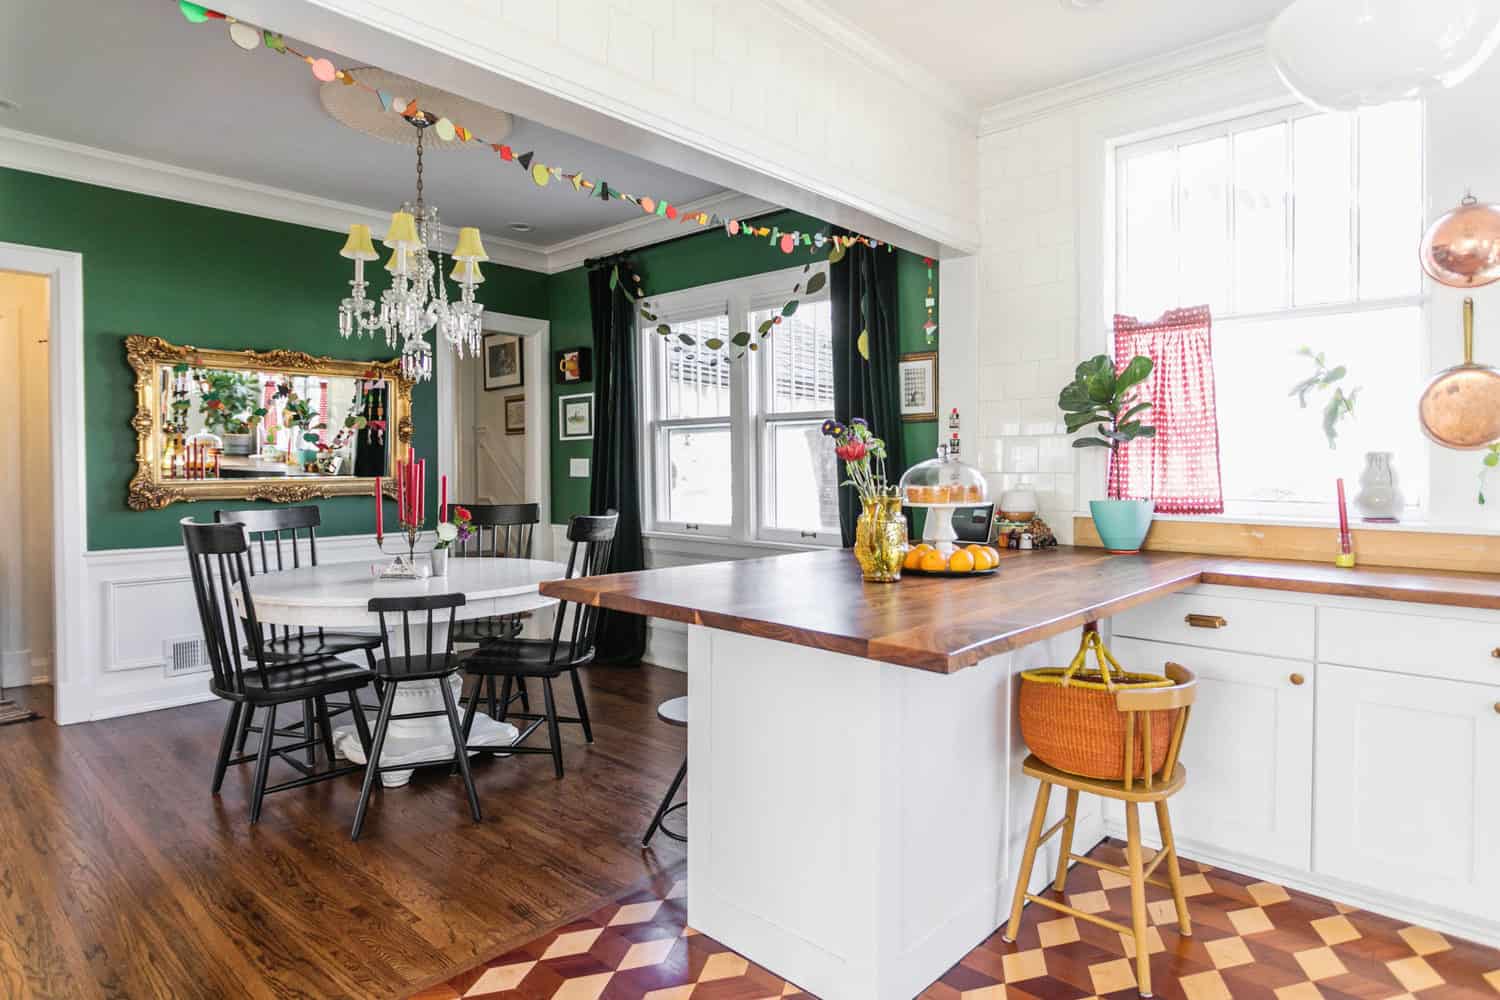
 The image above shows the angle from the kitchen into the dining area. I love that there used to be a wall where our kitchen counter is now where we spend so much time crafting and having fun.
All in all, we opened up the two main doorways into larger openings and joined the mudroom to the kitchen here. This created more flow between the family room, dining area and kitchen in this space of the home. What we wanted to do was make sure it felt bright and open, but at the same time, we didn’t want to go through busting down everything to create a home that looked nothing like a historical home on the inside. We were careful to match the millwork around the widened openings to make it look as though it was all original.
Fun fact: Our table is located where the original 1925 kitchen was! Our family room was the original 1925 dining room (our kitchen was an addition to the home in the ’50s).
 Thanks for taking the time to look through my living spaces! Just remember, this all took nine months to complete. There were lots of ups and downs, we spent more than we planned to, and it’s all worth it on the other end. Hopefully, this gives you the encouragement to take on that small or large project you’ve been itching to do. You can do it! (or … Jerry can.)
Credits // Author: Shailey Murphy. Photography: Janae Hardy and Shailey Murphy.
from A Beautiful Mess https://ift.tt/3aQotUx
via IFTTT