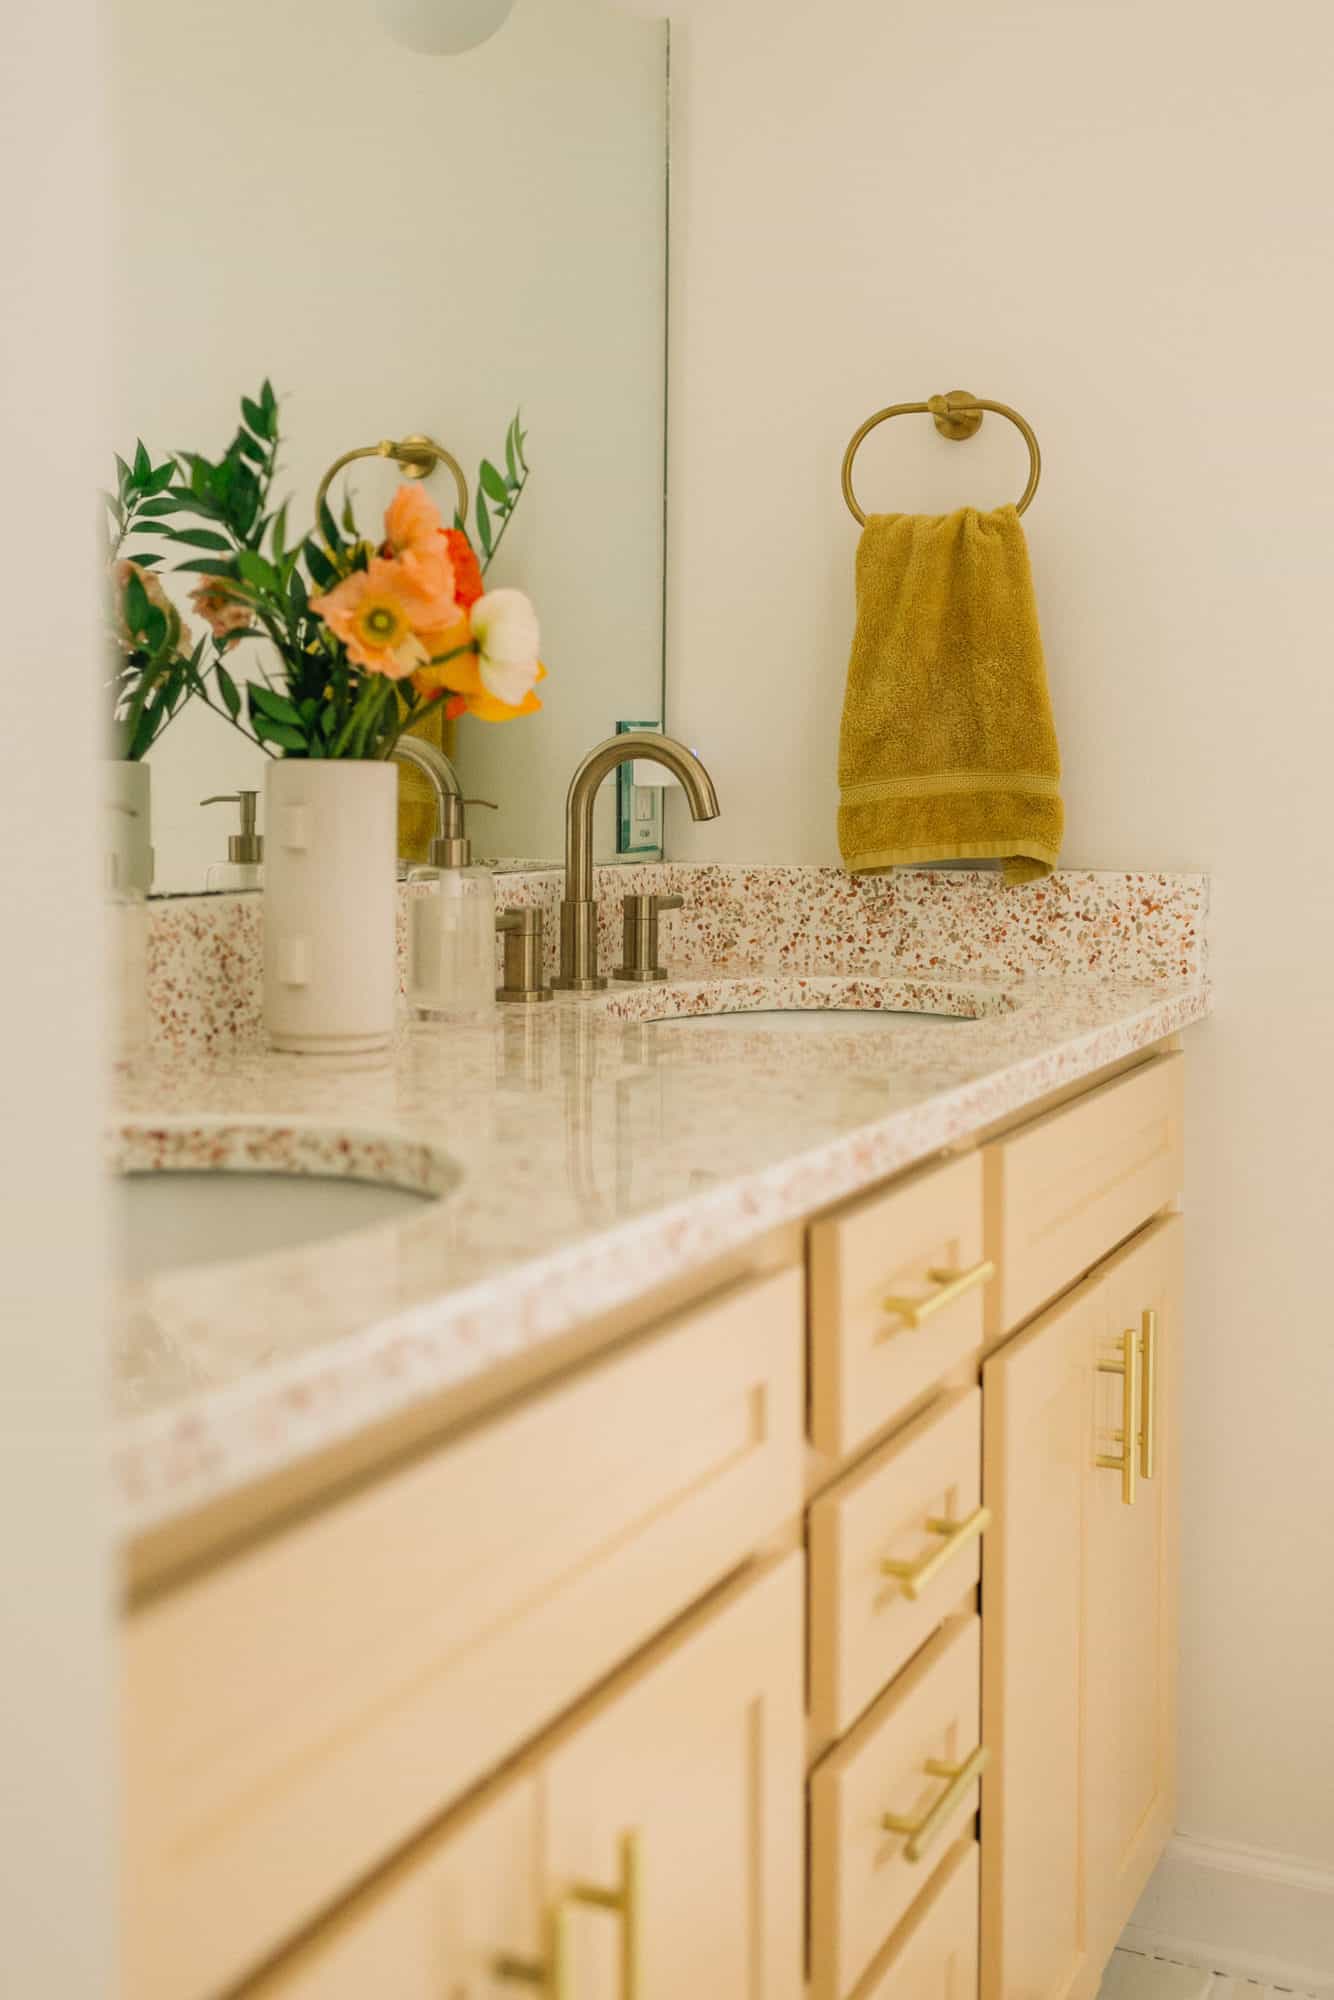
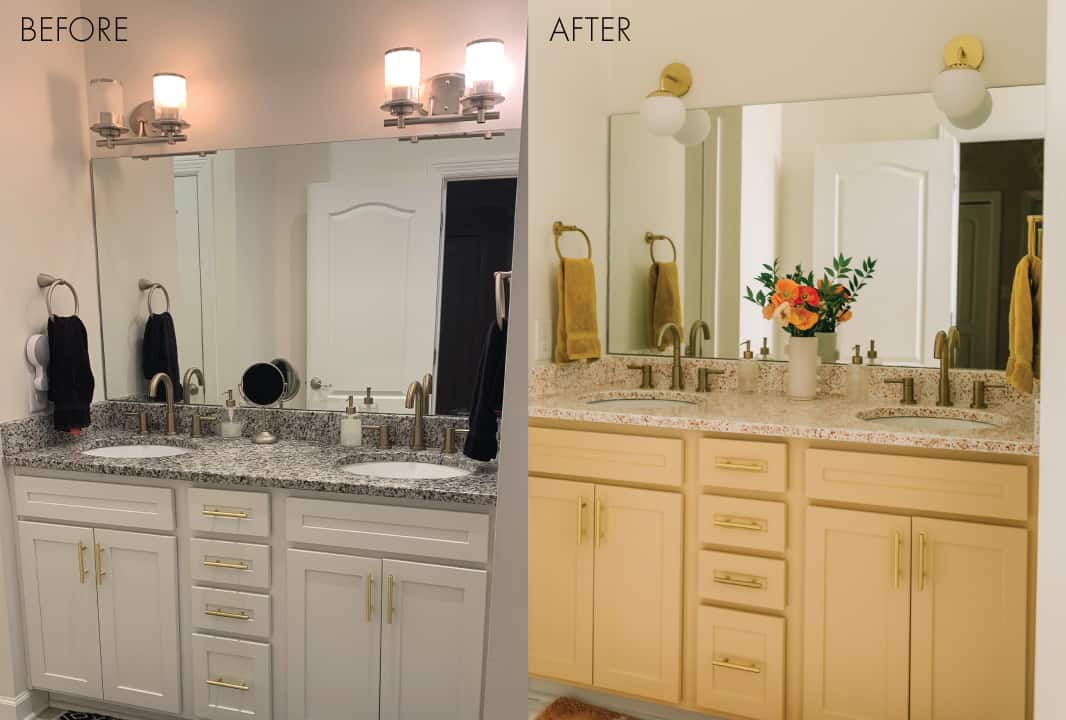
 I am very excited to share this project with you today! We are going to be gutting this bathroom in the next three or so years (it has some layout issues and a very dated Jacuzzi tub), so we thought—why not do something really fun and colorful in the meantime since the high-contrast black and grey granite is not our style?
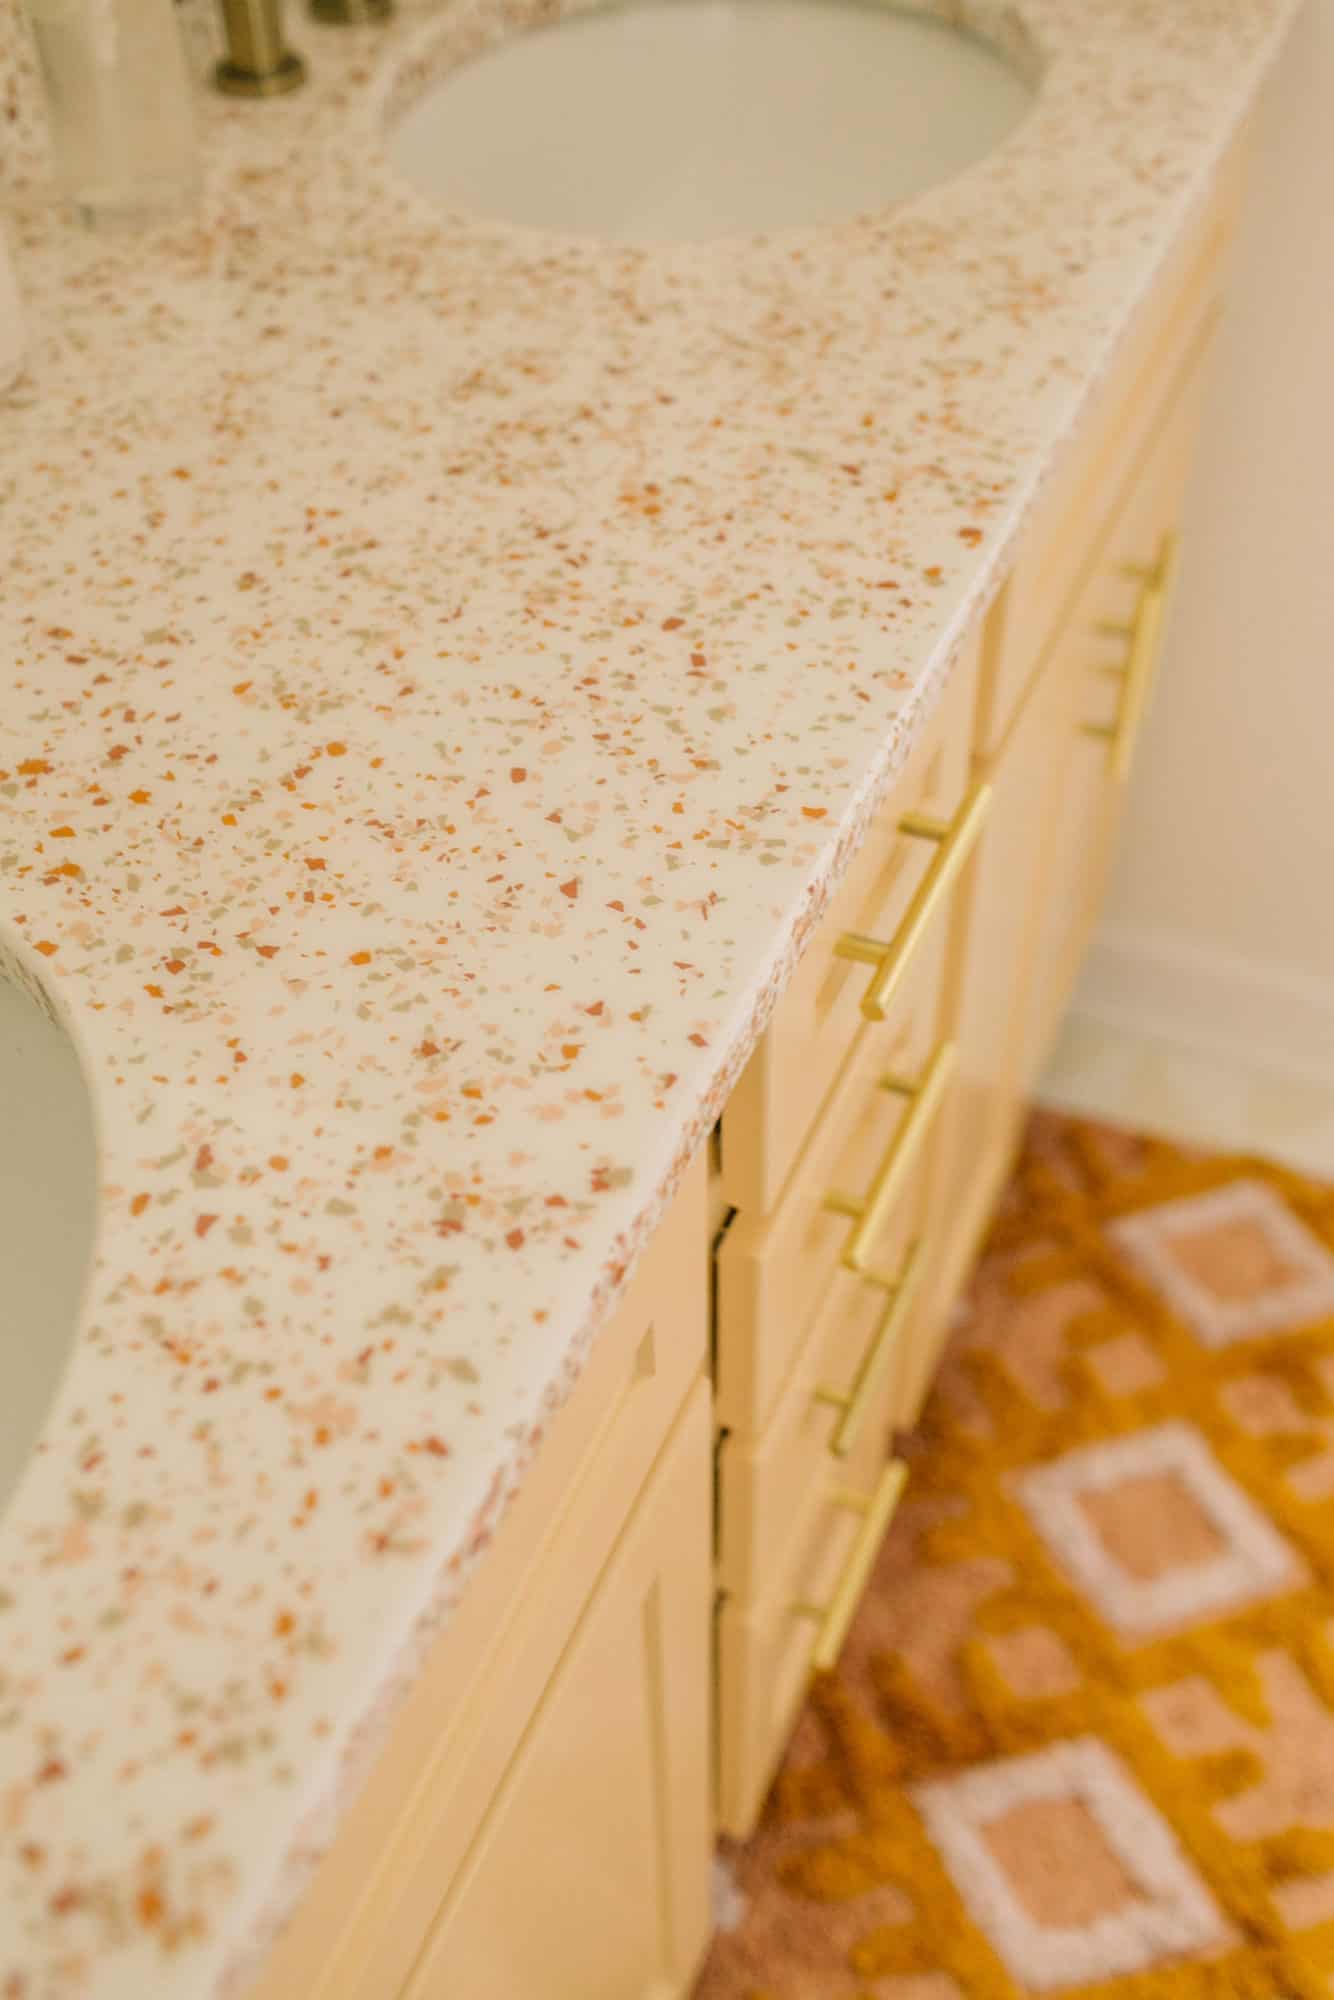
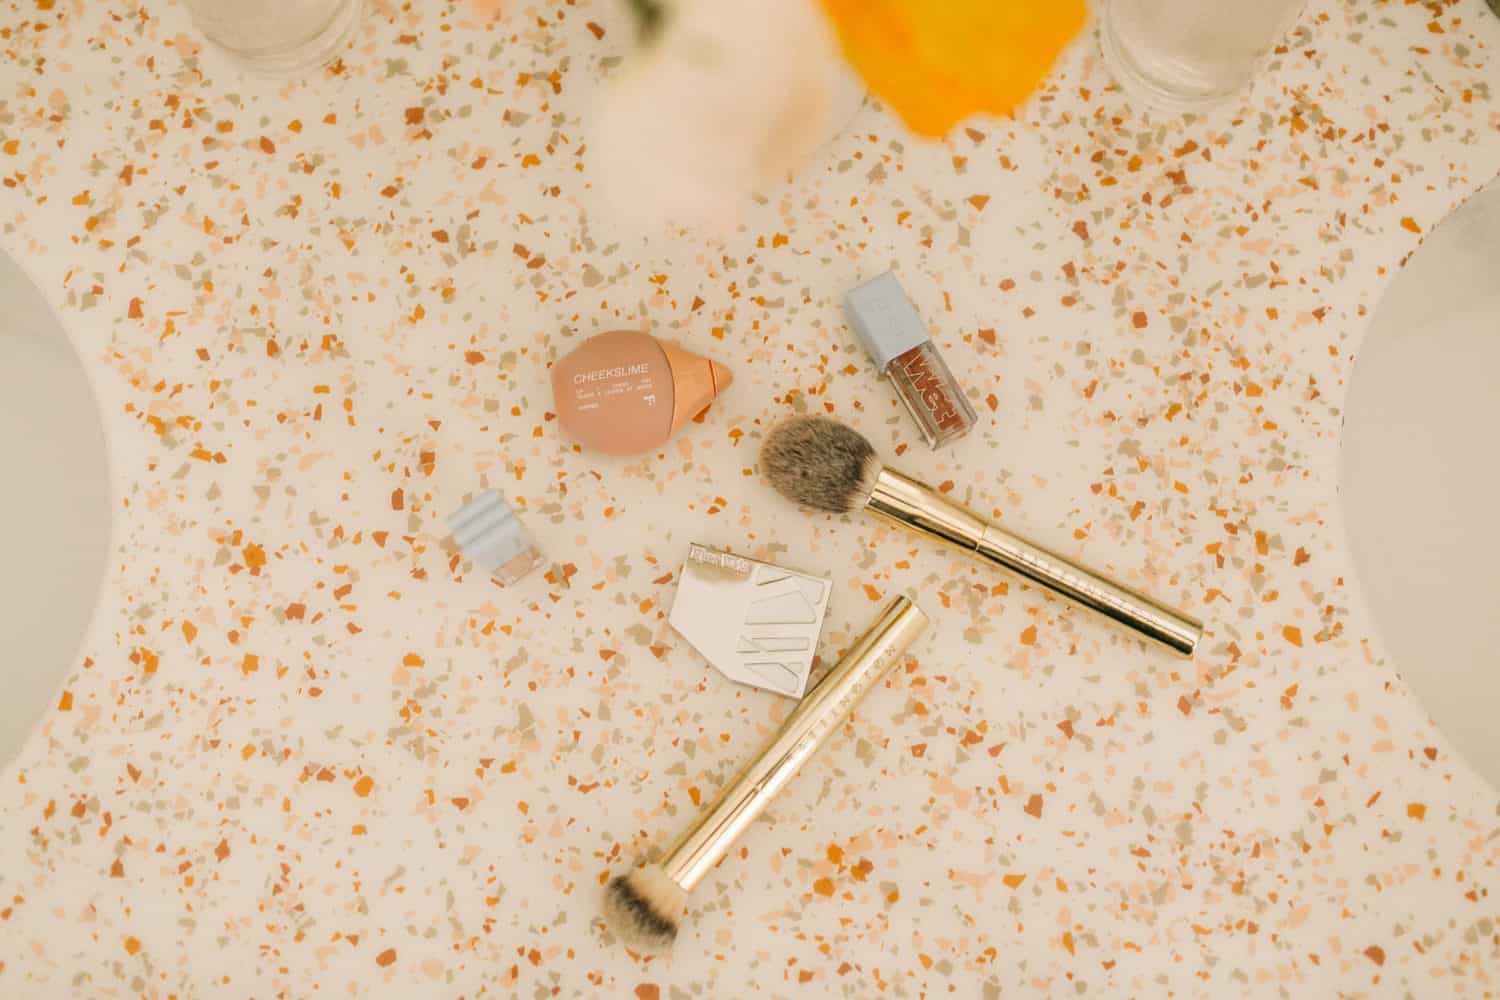
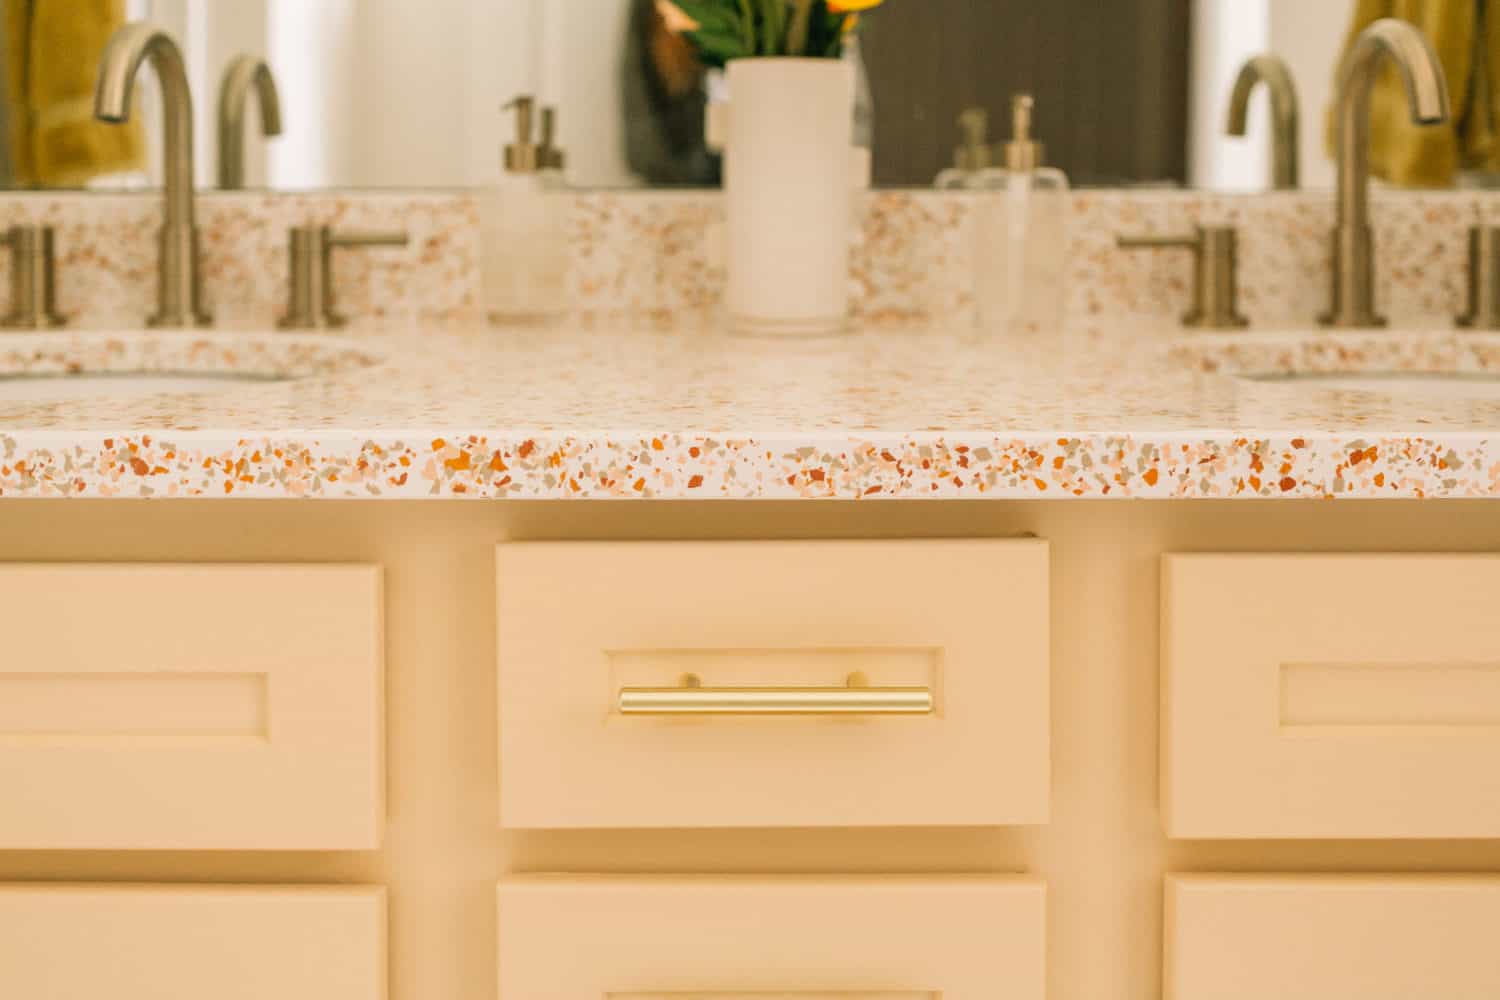
About five years ago in our previous home, we bought some custom-colored vinyl chips (commonly used for garage and commercial floors) and used them on a concrete floor in the converted garage part of the house with an epoxy over top. I’m absolutely in love with the modern terrazzo that’s been emerging in design the last few years and thought, If I ordered the chips a little bit bigger and tried this on a countertop, maybe I can replicate that terrazzo finish a little bit? We are so happy with the outcome.
 Here are a few disclaimers before I start walking you through the process:
it is extremely messy because of the chips going everywhere (you basically just throw them around, lol) and the protective gear should absolutely be worn when pouring and working with epoxy, and we watched about two hours worth of videos from Stone Coat Countertops, the company we bought the epoxy from, before we did a single thing to learn the proper technique for mixing, pouring, and working with this material. We also ordered a few granite samples (very similar to the original countertops) to do a trial run before, so highly recommend doing that if you can!
With all that being said, we feel that this project was 100% worth it.
Supplies:
–degreaser to clean the surface
-high adhesion bonding primer
-latex paint in your desired base color
-small paint roller
-small paintbrush for detailing
-colored vinyl chips (you can get custom color chips from this company. I like using their blend tool to see how things are going to look—they use Sherwin Williams colors, so if you need to go to the SW store and grab some paint swatches you can do that).
-dry paintbrush to clear away loose chips
-epoxy (highly recommend Stone Coat Countertops—it’s formulated for this type of project and there is a square footage calculator on this page so you can find out how much epoxy you need)
-disposable mixing bucket (it helped to have the ones with ounces marks from the hardware store so we could be really exact)
-a way to mix your epoxy, like a mixing attachment for a drill—just make sure the attachment is compatible with your specific drill
–trowel to spread epoxy
-short paintbrush(es) to “chop” epoxy
-blowtorch (make sure it can be held vertically upside down; otherwise, it will flare when the propane gets too low)
-tweezers
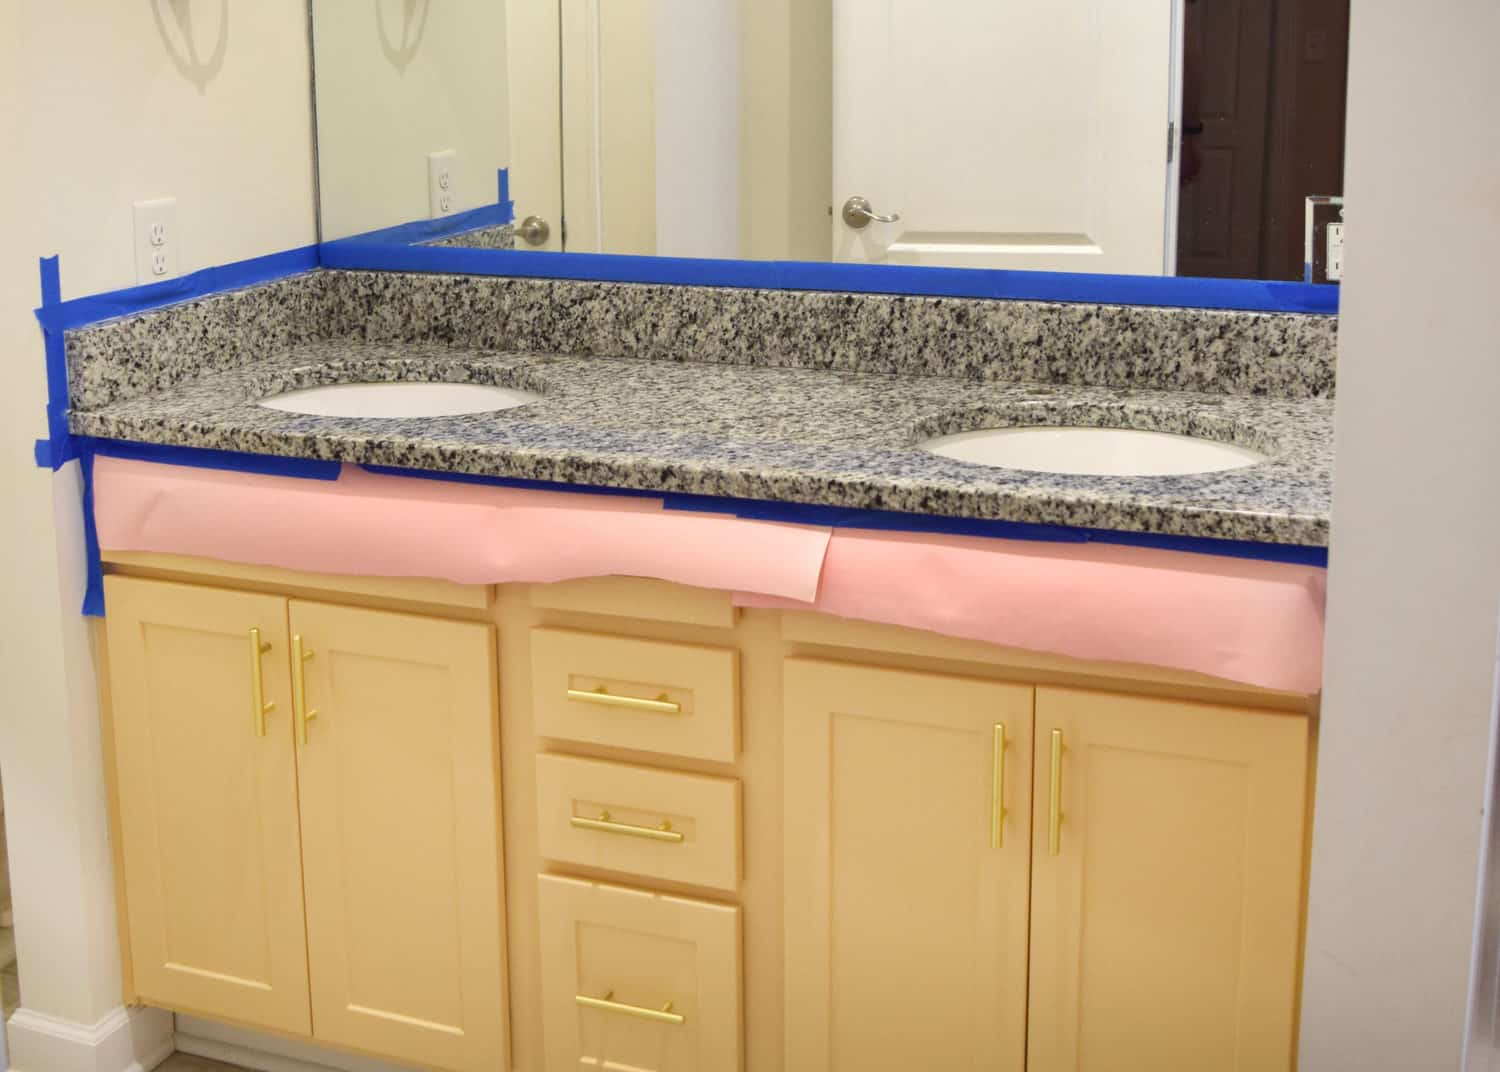
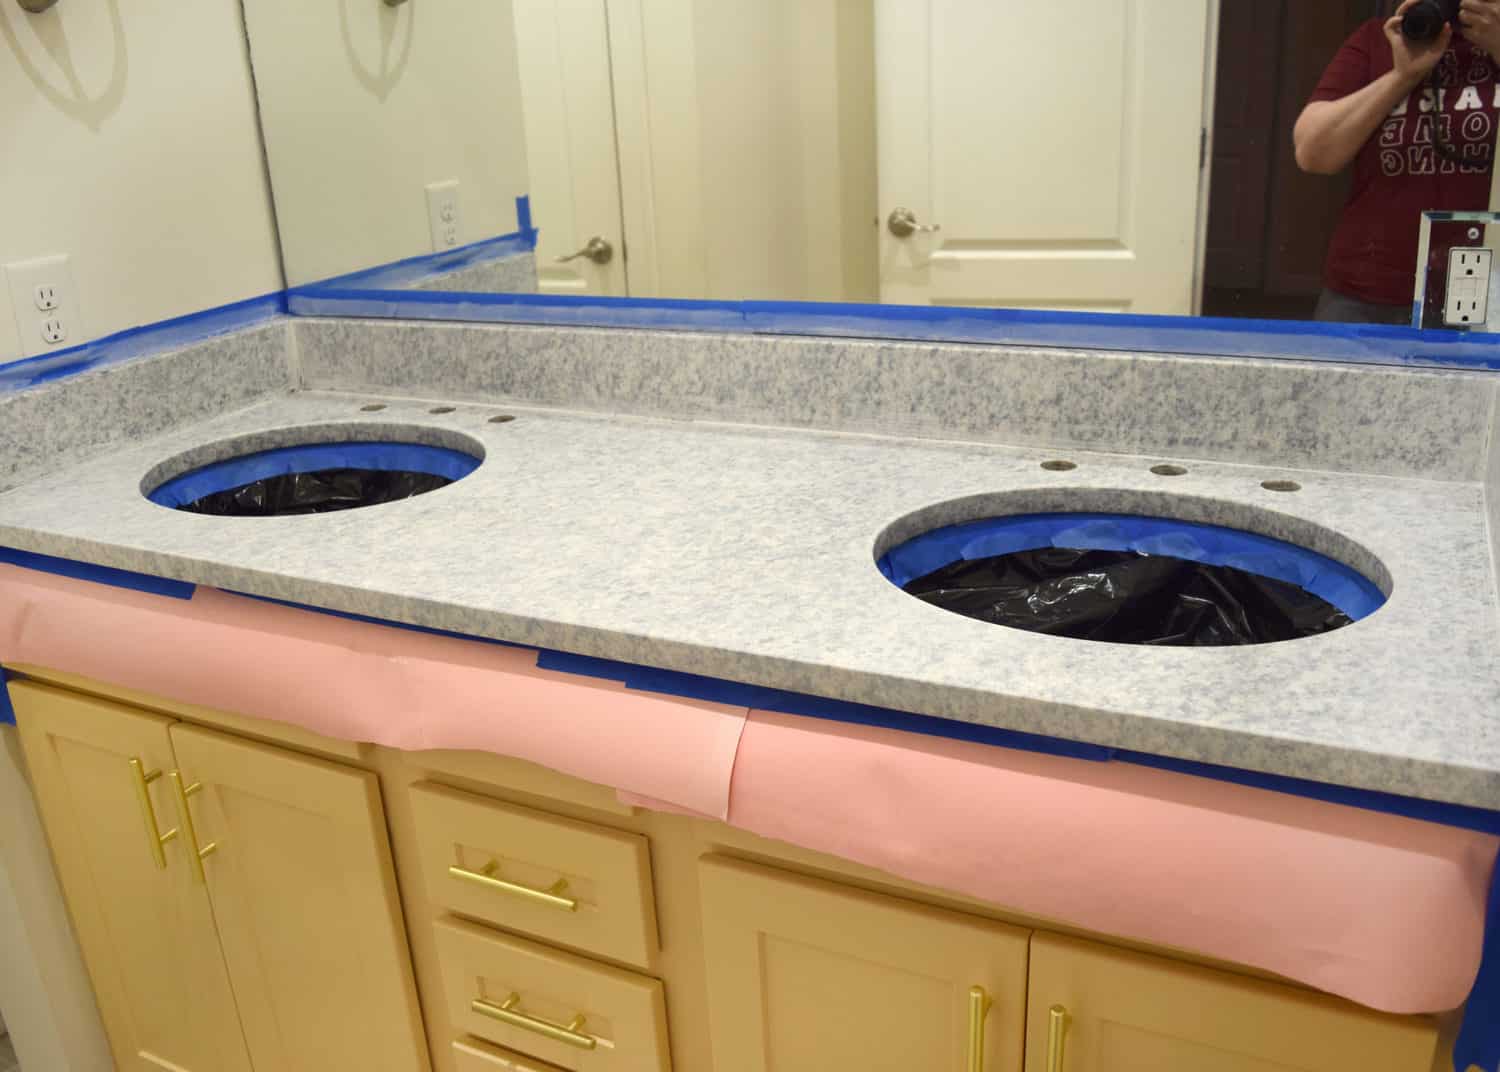 First, let’s talk about project prep. We cleaned our surface very thoroughly with a degreaser. Next, we taped off anywhere we didn’t want paint and epoxy to go. If you’re doing countertops this means any sinks along with areas surrounding your countertop/backsplash and definitely DON’T FORGET the faucet holes! We taped up plastic directly underneath and also laid plastic down in the bottom of the cabinets just in case. (Quick side note: We recently painted the cabinets of this vanity with this hard drying paint tutorial and it worked like a charm.) Next, we primed all our surfaces with the high adhesion bonding primer. We did two coats of this primer to get the best coverage.
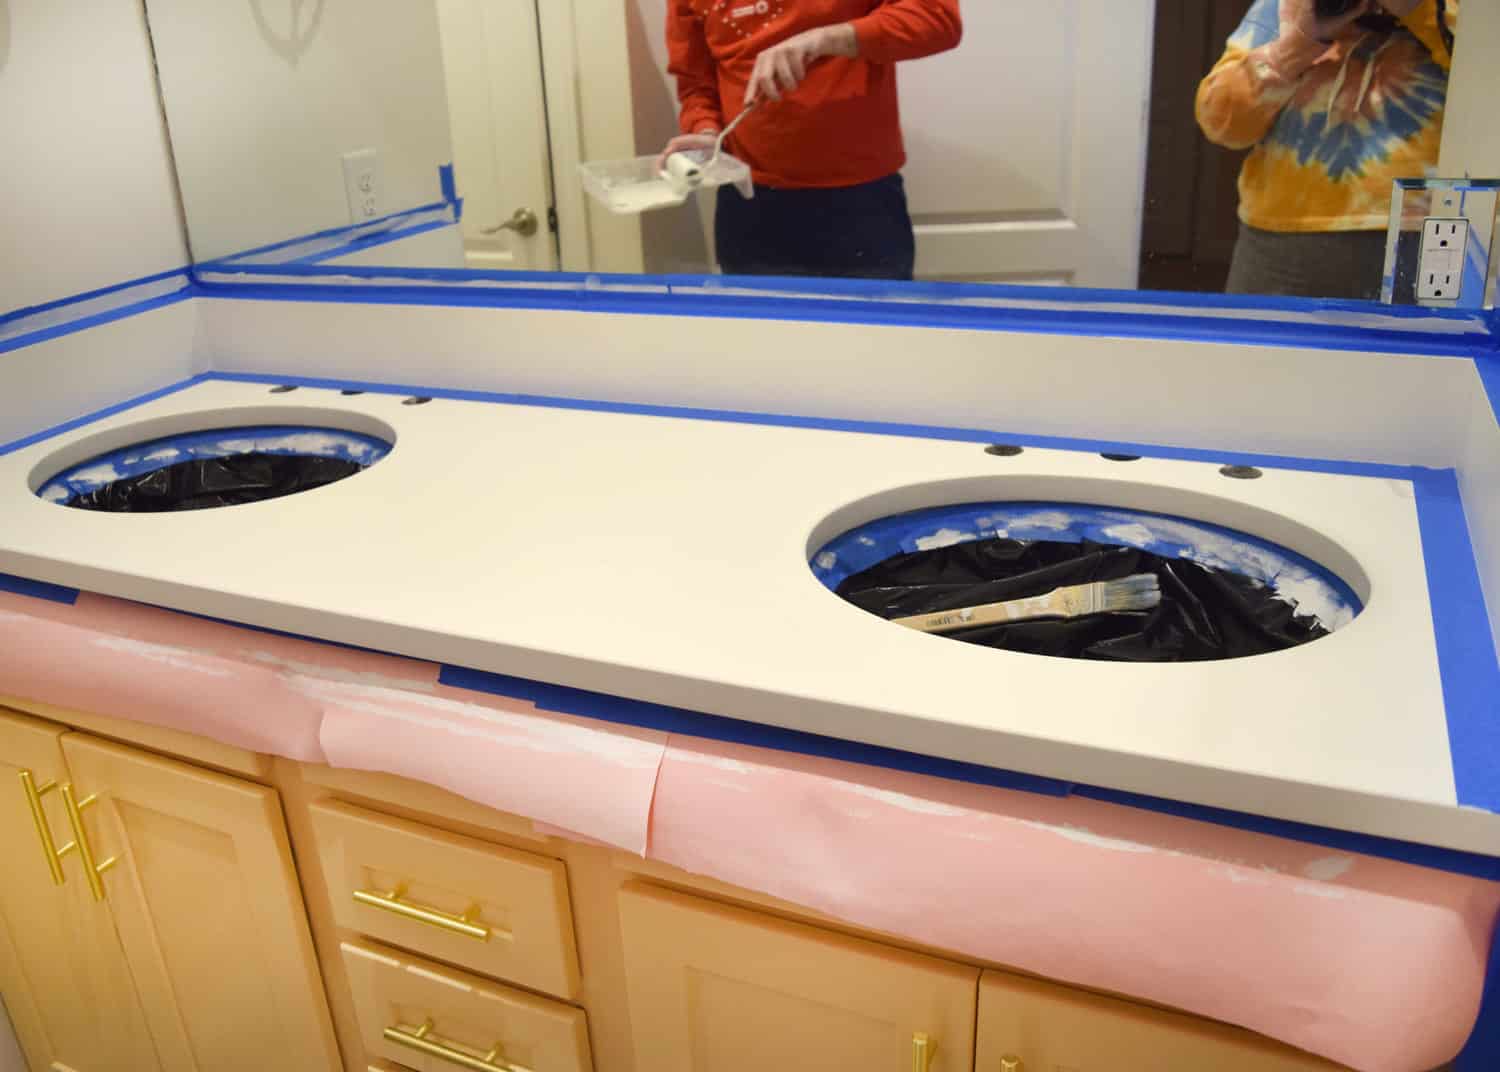 After your primer has dried for about four hours, you can start painting your base color, which is what will show through underneath your chips. We needed a solid two coats of white base paint (it’s just regular latex paint from the home improvement store). Keep in mind you will be doing another layer of paint after this one to spread the chips over your surface, but I highly recommend making sure the entire surface has really good coverage. The last thing you want to be worried about while you’re sprinkling/spreading your chips is covering up sparsely painted areas.
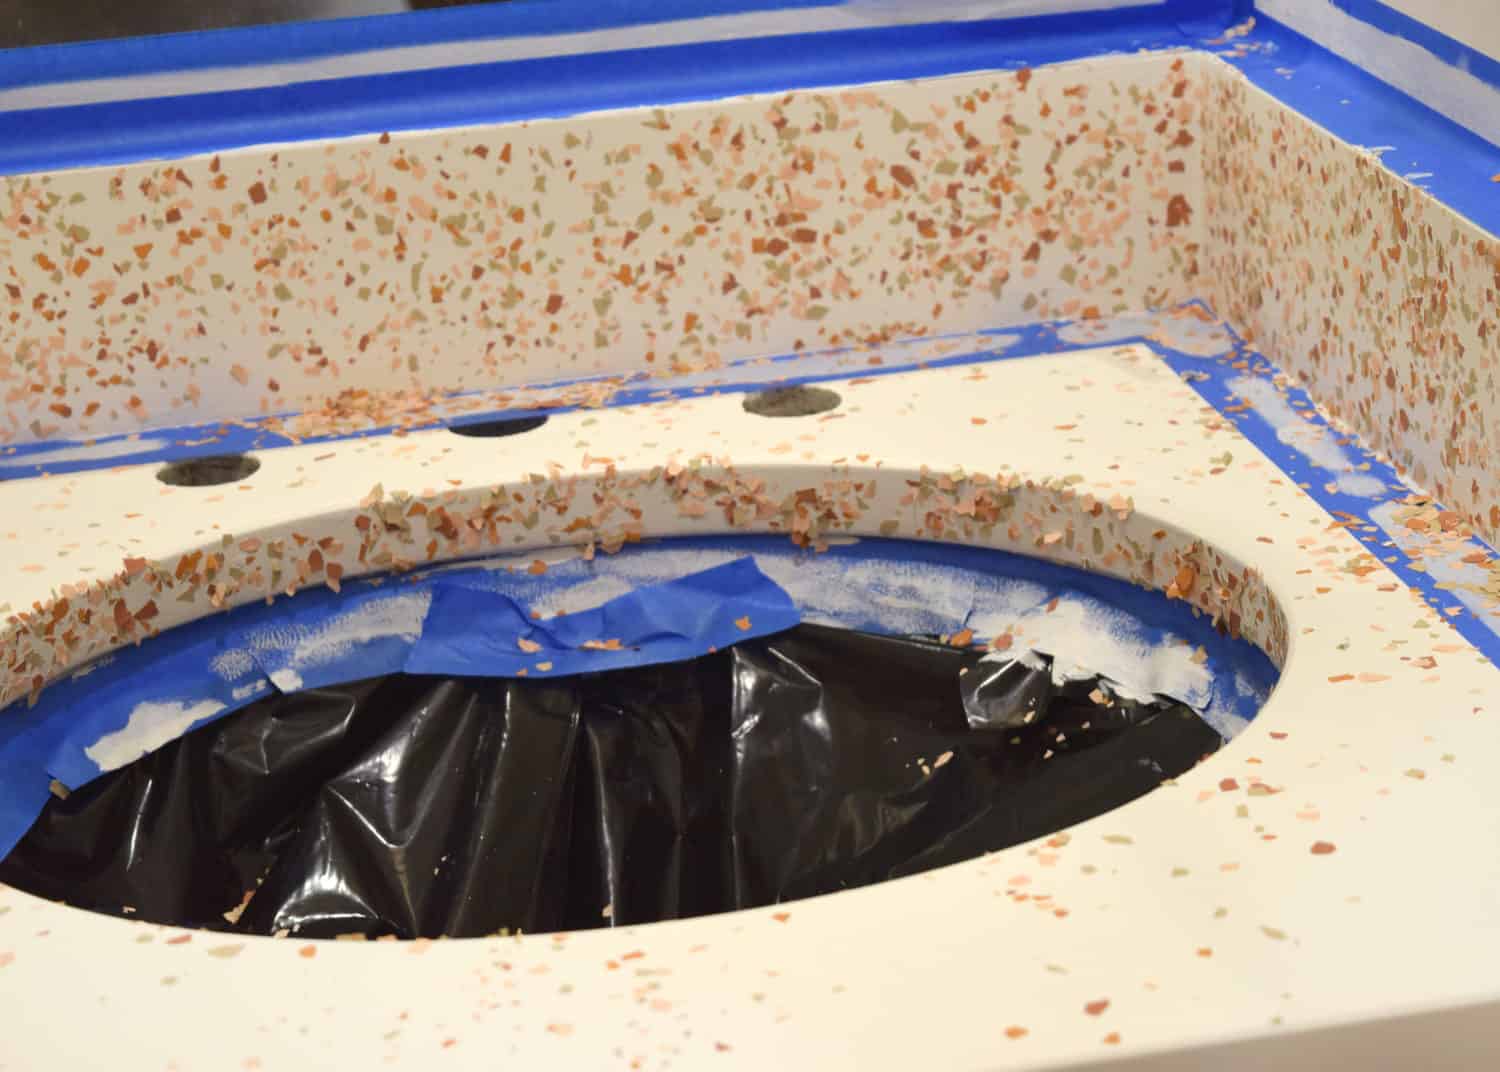 Our first move with the chips was to tackle all the vertical surfaces. To do that, we taped off the edges of the flat surfaces so paint/chips wouldn’t adhere to places we didn’t want them to (they could pile up and you’ll end up with way more chips than you wanted in any given spot). Then, we painted with the base color in small, approximately 4×9″ sections. Working quickly and while the paint is wet, we horizontally ‘threw’ the chips onto the painted area. This is certainly challenging but not impossible! On our first go-round, we realized our technique wasn’t working, so we scraped off the chips with a putty knife and started over again. Not the end of the world, but you want to get your throwing technique down before going all-in.
You can see in the photo above that the sink vertical looks pretty messy, so here’s how we cleaned it up: Once the paint is just barely dry, we patted down the chips with gloved hands to help it adhere to the paint. You want to make sure you aren’t tracking paint onto your chips, so if the paint is wet at all, wait! After we applied some pressure to the chips, we took our hands and swiped them over the finished spots to break off any loose chips. It’s important to get as many loose chips off your surface as possible so they’re not floating around in the epoxy later.
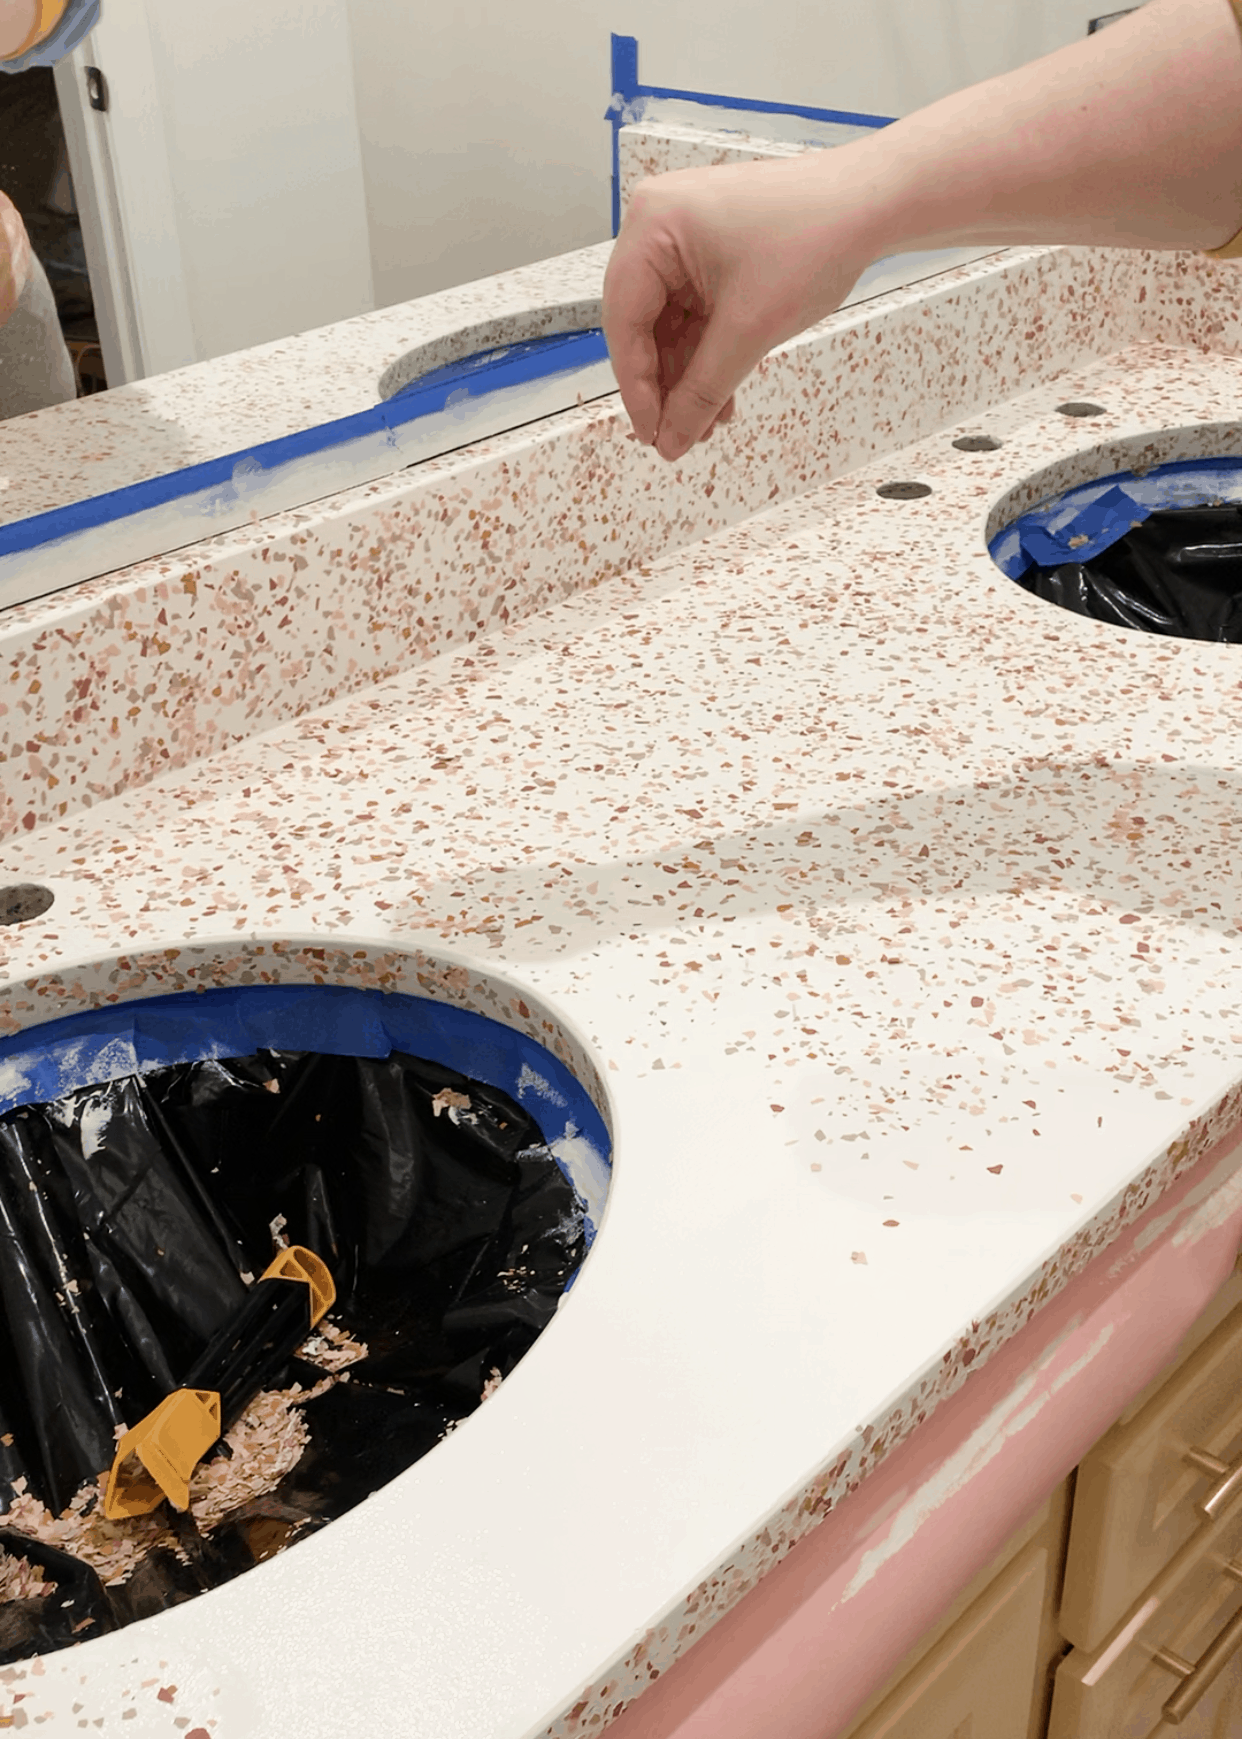
After this step, you may notice that you have some bald spots that are in need of more chips to create an even look. To fix this, you can do a spot treatment. Just grab a very small paintbrush, dip it in your base color, and spot treat the areas that need attention. Repeat the pressing and swiping process again to remove any loose chips. It’s possible you may have to repeat this process a few times, but patience will pay off if you want an even distribution of chips.
Once you are finished with entire backsplash, sink, and front vertical surfaces, you can use a dry, clean paintbrush to clean off any loose chips. We just brushed them into the sink since it had tape and a barrier.
 Next, we removed the tape from the flat surfaces so we could add the chips—this part was so much easier than the verticals! Be sure to still only paint in small sections because you want your paint to be as wet as possible so the chips adhere properly. Instead of throwing, we took the chips pinched between our fingers and just moved them back and forth, kind of like you’re feeding food flakes to a fish (that’s the best example I can think of, haha). Repeat the spot treatment on the flat surfaces if you need to! Let your chips and paint dry for at least 12 hours.
It’s finally epoxy time! I highly recommend going through Stone Coat Countertops’ YouTube channel. We watched a lot of videos but this one is a good place to start. Before you start the epoxy you’ll also want to tape up plastic sheeting over your cabinets so the epoxy doesn’t drip onto them.
We mixed our epoxy by adding the hardener to the resin and mixing for two minutes (could be more or less depending on what you’re using). Check out the specific product you’re using for how much product you’ll need to mix for your surface area. The formula we used didn’t have a smell to it, but we wore masks, gloves, and glasses just in case.  Next up, we poured the epoxy and spread it over the surface with the trowel. Just know that because of the chips the trowel will “catch” since it’s a textured surface. We got around this by not applying very much pressure at all while we were spreading the product. You’ll want to cover as much surface area as you can with your trowel since it will help make sure the epoxy is as level as possible before it starts self-leveling. After we had most of the surface area covered, we took our short brushes and “chopped” the epoxy by repeatedly tapping the brushes over the entire surface area. If you’re dealing with any vertical surfaces like a backsplash, just do your best to distribute the epoxy with your paintbrush. The epoxy will probably start to pool under your backsplash, so just keep picking that extra product up with your brush and redistributing it where it needs to be until the epoxy starts to set.
We then went over the entire flat surface with the flame from a blowtorch to eliminate air bubbles. Do not torch your vertical surface as the epoxy doesn’t settle in the same way on those surfaces. I highly recommend getting a blowtorch you can hold upside down OR getting a few cans of propane because the torch will flare if the propane gets too low.
To start the finishing steps, we removed any taped places, like the sink bowls and around the backsplash. Then we grabbed a few pairs of tweezers and painstakingly looked over every square inch for hairs and other particles that shouldn’t be in the epoxy. We had about 45 minutes to work with the wet epoxy before things started setting. Now is a good time to remember that your job won’t be absolutely perfect—there will most likely be a few things you missed that set into the epoxy, or maybe a few air bubbles that didn’t pop. That’s OK! Just do your best and it’s going to come out beautifully.
To close out the project, we went over the whole area with the blowtorch a few more times, just to try and get all the air bubbles we can. We waited three days to use the countertops lightly, and they fully cured in 30 days. We are SO thrilled with this new look—it makes us happy every time we walk in the bathroom!
 Thanks for following along, and best of luck if you decide to take on this project! xo, Keely
DIY Faux-Terrazzo Countertops
Ingredients
- Degreaser to clean the surface
- High adhesion bonding primer
- Latex paint in your desired base color
- Small paint roller
- Small paintbrush for detailing
- Colored vinyl chips
- Dry paintbrush to clear away loose chips
- Epoxy (highly recommend Stone Coat Countertops—it's formulated for this type of project)
- Disposable bucket for mixing epoxy
- A way to mix your epoxy, like a mixing attachment for a drill
- Trowel to spread epoxy
- Short paintbrush(es) to "chop" epoxy
- Blowtorch (make sure it can be held vertically upside down; otherwise it will flare when the propane gets too low)
- Tweezers
Instructions
-
Clean your surface with a degreaser, like Krud Kutter
-
Tape off any surfaces that you do not want to get paint or epoxy on, like sinks and walls. Use plastic sheeting to catch any runoff down the front of the vanity.
-
Prime your surface with a high adhesion bonding primer (we did 2 coats)
-
Once your primer has dried for at least 4 hours, begin painting with your base color. Use as many coats as necessary until you get the desired coverage (we did 2 coats)
-
Roll another layer of paint onto a small area (we did about 5x9" sections), then sprinkle your chips. If attempting to deposit chips on a vertical surface, throw the chips directly at the surface). Don't skimp on the amount of paint, you want there to be enough for the chips to stick to!
-
Once the paint is dry, take your hand and press the chips into the surface. Be sure you aren't getting paint on your hands and tracking it onto the chips!
-
When you are certain paint is dry, swipe your hand over the surface to loosen chips that didn't adhere completely. Use your dry paintbrush to brush loose chips into the sink or in another receptacle.
-
If you notice any "bald spots," go in with your very small detailing brush. Apply paint to the surface, then sprinkle chips again over that spot. Repeat the pressing and swiping process to ensure you have as few loose chips as possible. You may need to do this a few times before you're completely satisfied with the coverage as chips WILL come off. The goal is to not have loose chips in the epoxy (you will have them no matter what, but we want to have as few as possible).
-
Wait at least 12 hours for the paint to fully harden.
-
Mix your epoxy (hardener and resin) with the mixing attachment for 2 minutes. Check your epoxy product for how much you need to mix and what the working time is (how long you have before the epoxy sets).
-
After pouring the epoxy, take your trowel and spread it over your surface. Try to cover as much as possible with the trowel. It will get caught on the chips as they make a "bumpy" surface, but applying a very light pressure as opposed to trying to drag it right over the chips will help.
-
"Chop" your epoxy with your new paintbrush by repeatedly tapping your brush over the entire surface area.
-
If you're dealing with a vertical surface, you'll need to just keep adding epoxy to those surfaces. It will pool directly below, so just keep taking that epoxy where it's pooling and redepositing it onto the vertical surface.
-
With your blowtorch, go over the entire flat surface to eliminate air bubbles. Do not torch your vertical surface as the epoxy doesn't settle in the same way on those surfaces.
-
Before the epoxy dries, remove any tape around the perimeter and sinks very gently. If you wait until after the epoxy dries, the tape will become extremely difficult to remove.
-
Look over your surface VERY carefully for hairs (I know, gross) or other foreign objects/pieces that have made it into your wet epoxy. With your tweezers, carefully remove them. Once the epoxy is set you will not have the opportunity to do this, so continually looking for anything like this is pretty crucial at this stage.
-
Go over the surface with your blowtorch a few more times to eliminate any air bubbles that might have formed.
-
Allow the epoxy to cure for 3 days before light use. It will continue to cure over 30 days.
Credits//Author: Keely Rust. “After” Photography: Amber Kelly. Photos edited with A Color Story Desktop
from A Beautiful Mess https://ift.tt/3mGPvBL
via IFTTT